Saturday 29 December 2012

Stream music from your computer to Xbox 360

Over xmas my son ask me for some music on his xbox.
Easy I thought ... no so!
it is easy if you have Vista, W7 & W8 but not if you have a dinosaur media system based on xp.
But you can get there in the end.
Follow these steps:
  1. Read this post on the XBoz site.http://windows.microsoft.com/en-GB/windows-xp/help/windows-media-player/11/stream-xbox.
    This should get you up to speed on what you need to do.
  2. Download media Player or Zune (if you can stand the Metro look and feel).
  3. Start the sharing process as described in the first article.
  4. Test the connection from the xbox;
  5. If it fails (as it did for me) check the service "Windows Media Player Network Sharing Service".
    -Open the task manager. (ctrl+alt+del)
    -Go to the Services Tab.
    -Click on the Services button and minimize task manager.
    -In new Services Window, right click on Windows Media Player Network Sharing Service.
    -Select Properties.
    -go to Log On tab.
    -if Local System Account is not highlighted, then you've most likely found the problem. Select Local System Account radio button, click Apply and OK, then right click on Windows Media Player Network Sharing Service again and select restart service.
That should sort it!

Tuesday 4 December 2012

Pre-configured stacks ... nice!


http://bitnami.org/stack/tomcatstack
I haven't tried these yet but they look worth a go ...
There are a number of different pre configured stacks for your downloading and installing pleasure.

Including installers for vm-ware ... nice!

Wednesday 17 October 2012

How Many connections are open to your MySQL database

Issue the query ...

SHOW STATUS
where Variable_name like 'Threads_connected'


And that's it!

Friday 12 October 2012

Web projects have a "No org.apache.tomcat.InstanceManager set in ServletContext"

When creating a web project in eclipse I keep geting an error "No org.apache.tomcat.InstanceManager set in ServletContext" within the JSP files created and placed into the work folder. While it does not stop the project running it is very anoying.
It can be easily fixed by adding the tomcat-api.jar to your list or libraries.
I recommend you add it as follows:
  1. Start to edit your project class path;
  2. Click add variable;
  3. Click the TOMCAT_HOME variable followed by the Extend... button; This will allow you to browse for the libs/tomcat-api.jar file;
  4. Click OK and you should get the following in your list of directories:
And you are done ... In this way it will be portable to someone elses PC.

An interesting article on stackoverflow can be found here : http://stackoverflow.com/questions/8064039/why-shouldnt-we-place-tomcat-library-in-our-appln-libraries

Monday 8 October 2012

Spring Security 3.0.x J2EE Pre-Authentication Example


A developer called "Steve Krall" wrote this:
"The pre-authentication sample application provided by spring-security is confusing. It seems to use an outdated XML configuration. I wanted to find a simple example, but I was only able to piece together the various configuration options from forum posts and the spring-security documentation. This sample is more of what I was looking for. Hopefully it's useful to others."

https://github.com/skrall/spring-security-j2ee-preauth-example

Thanks Steve!

Friday 5 October 2012

Setting the time and date in CENTOS

Sometimes, you may get the following error while trying to sync your Ubuntu server time with the NTP server using "ntpdate" command:

============
~# sudo ntpdate pool.ntp.org
5 Dec 01:32:33 ntpdate[21647]: the NTP socket is in use, exiting
============


The ntpdate command will not run when the NTP server is running. If you run ntpdate and get a response like "the NTP socket is in use", that means your NTP server is running. Stop it with the command:

===
sudo /etc/init.d/ntp stop
===

You can now run ntpdate with the server you want to sync against as an argument. For example, to tell ntpdate to try and sync with "pool.ntp.org", run:

===
sudo ntpdate pool.ntp.org
===

When you're finished testing remember to start NTP back up again:

===
sudo /etc/init.d/ntp start
===

Thursday 4 October 2012

Just in time Analysis - WTF!?!

Just-in-Time Requirements Analysis is the antithesis of
traditional analysis. Where in traditional development you strive to understand and define everything. Within JITRA you attempt to define just enough to satisfy planning and development.

It is a discipline that fits well with an Agile development process such as  Scrum. Focus shifts from defining everything to the last and final detail and shifts to ensuring that you have sufficient information to precede with the next phase of development. It is intended that requirements are only analysed as they are identified by the business as objectives or deliverables.

As agile processes generally follow a process of continuous revision and refinement; JITRA defines a process where requirements are continuously analysed and defined throughout the life cycle of a project. The important difference between JITRA and Waterfall Analysis is that the requirements are only analysed and defined when they are needed and only at the level of detail required.

So you don't sit specifying features that may never be requested by the business. Instead you focus on the next elements that are actually needed.
  • The key points of JITRA that distingish it from other analysis methodologies are:
  • Requirements aren’t analyzed or defined until they are needed.
    Only a small initial investment in analysis is required at the start.
  • Actual development is allowed to begin with partial requirements.
  • Analysis and requirements definition contiues throughout the project.
  • Requirements are continuously refined as the project moves on, as stake holders see features and understand the problems they are attempting to solve.
  • Change is expected and should be easy to incorporate into requirements.
  • Analysis tasks compliment the agile or scrum planning process.
What are the benefits of such a process?

While performing waterfall analysis you may find your self having to speculate on system uses and potential pitfalls. Because JITRA has the paradym of not only defining it when it is needed, you perform your analysis and create the definition closer to when it is needed. This ensures that the analysis benefits from all information revealed by previous development work and stake holder feed back.
As the process complements Agile executives know that they are getting a return on their investment as the analysis feeds the development which delivers a business benefit.

What is a JITRA process?
The process is simple and if you are engaged in an agile development you may discover that you are already doing JITRA you simply dis not have a label for it.
The process starts at the highest levels of system abstraction and requirements, which will be continuously refined over the life cycle of the project. The analyst along with the stake holders must prioritise the most important features for analysis first. When the features are analysed it is always ONLY to the level of detail which meets the current requirements of the project - no more , no less.
For instance for a system that is completely new then sufficient analysis must be performed to specify, describe and understand the problem. With stake-holders informed and high level features of a system understood further analysis may be performed which answers questions specific to the first phase of the project and outlines a path for further phases.

JITRA defines four major analysis activities:
• Initial Analysis
• Feature Set Analysis
• Story Analysis
• After-action Analysis
These activities are performed continuously throughout a project’s life cycle, and may over lap each other in scope and detail.

Initial Analysis
The Initial Analysis activity is performed at the start of a new unit of work. This unit may be an individual system, a system of systems, a subordinate subsystem, or individual subsystem components. The purpose of this activity is to broadly define the scope for the work ahead and to specify an initial set of features, functions, and capabilities required for the specified unit of work. This may take a few hours or considerably longer depending on the overall size of the unit of work. The important point to stress is that no more analysis is performed than is actually needed to allow follow-on-activities to proceed. This doesn’t have to be a detailed understanding, but as a minimum the team must have a reasonable knowledge so that there can be an expectation of success if the project moves forward.
The final task of Initial Analysis is to define a generalized list of things the new system needs to do. This list might be a simple bullet list, or it might be detailed in one or more high-level Stories.
At the top-level, a unit of work may specify a system of systems. Initial Analysis is performed at the top level and then the unit of work is partitioned into one or more subordinate units of work.
This hierarchical decomposition is recursive and may continue down any number of levels. At each level an initial analysis is performed and the unit of work is either partitioned into subordinate units of work, or Initial Analysis is completed and Feature Set Analysis is begun.
BUT no more analysis than is required to precede is performed.

The output  of this process may be a formal document or the analysis may be communicated as a list, or it may be built into one or more high-level User Stories.

Feature Set Analysis
Feature Set Analysis (FSA) is performed continuously throughout the life cycle of a project. It’s purpose to build User Stories that feed into iteration planning and into individual iteration development. Most of the analysis effort on any project is performed as part of FSA, and it is the heart of the JITRA process.
At the start of FSA, all of the features, functions, and capabilities that have not yet been implemented (or which have only been partially implemented) are reviewed and prioritized by the Requirements
Stakeholders. This process allows stakeholders – and not developers - to identify what parts of
the system get the most focus, and always ensures that the most important part of the system will be analysed and developed next.

The output of FSA are groups of User Stories within the project backlog. These User Stories should be detailed enough to allow follow-on iteration planning, yet they do not have to be detailed enough to implement. In a some cases, the anlyst may discover that the selected Feature Set is too big to fit into a few iterations (sprints). In these situations the analyst's focus is applied to the highest priority
items (as identified by the stake holders) first, and return the unanalyzed items to the list of
unimplemented features, functions, and capabilities.
These items will then be addressed in follow-on Feature


Add further notes: start p140
http://cf.agilealliance.org/articles/system/article/file/1007/file.pdf

Tuesday 18 September 2012

wget HEAD request?

I wanted  to send HTTP HEAD request using wget, is it possible I wondered?

No as it's not wget, but you can do that quite easily by using curl.
curl -I http://www.superuser.com/
Produces this output:
HTTP/1.1 301 Moved Permanently                        
Content-Length: 144                       
Content-Type: text/html; charset=UTF-8     
Location: http://superuser.com/
Date: Sat, 09 Oct 2010 19:11:50 GMT
 
Thanks superuser.com!

Download Java JRE/JDK 7 from shell

File under the heading of Arrgh @#@?#&!

While setting up Tomcat7 from a console window on CENTOS I thought I would download the JDK but you can't because the fhe first step to do so, is to wget (download) the rpm / bin install file?

But as a fellar called Shmuel points out "Well it seems like since Java7, you must accept license agreement on the download page, before you can download java, which make sense. The problem with that is that you cannot accept this license agreement if you are on shell, doing wget."

In summary:
  1. Use Firefox & enable Fiddler to spy on your browser history;
  2. Go and find the down load you need from here;
  3. Accept the licence conditions and start the down;
  4. Then copy from fiddler the URL and most importantly the authorisation parameter which you can just add to your wget url.

Saturday 8 September 2012

Set up Remote Debugging in Tomcat

Debugging tomcat can be a little but of a pain especially when it is a remote server.
So a quick solution is to use a remote debug option.
A good article on this can be found here (http://en.newinstance.it/2005/10/04/remote-debugging-tomcat-with-eclipse/).
But to add to this information I created a batch file called "runDebug.bat" in the tomcat/bin folder.

The file is:

set JPDA_TRANSPORT=dt_socket
set JPDA_ADDRESS=5050
catalina jpda start

Adding process monitoring

Having set that up you may want to use JConsole to monitor the process.
JConsole comes with the JDK and can be found lurking in the bin folder of your Java installation. 

To enable it with Tomcat you need to mmend your batch file as follows:

set JPDA_TRANSPORT=dt_socket
set JPDA_ADDRESS=5050
set JXM_PORT=5636
set CATALINA_OPTS=-Dcom.sun.management.jmxremote -Dcom.sun.management.jmxremote.port=%JXM_PORT% -Dcom.sun.management.jmxremote.authenticate=false -Dcom.sun.management.jmxremote.ssl=false -Dcom.sun.management.jmxremote.hostname=%COMPUTERNAME%/%JXM_PORT%

(NB. Make sure the CATALINA_OPTS is on one line).

A usefull reference on JConsole can be found here (http://java.sun.com/developer/technicalArticles/J2SE/jconsole.html)
 
The next thing you will want to do is add some MBeans to your project. Which can be handled via Annotations.


Friday 31 August 2012

So which Jar is that class actually in?

When you can't find the JAR that a particular class is in it can be a frustrating experience.
Next time try this code snipit:

    URL url = Dodgy.class.getProtectionDomain().getCodeSource().getLocation();
    logger.debug(url.toString());

Now you should be able to tell where the offending class is!

Saturday 21 July 2012

The real way to get information about Java Generics

An other bit of plagarism I am afraid but again on a task that I had searche for long and hard.
This is related to the problem of using Java reflection to examine generics. There are may articles  that will tell you is just can't be done at runtime and that the information has disappeared.

Not so!

The following code will show that you can do it:


    class TargetClass
    {
    public List<String> getData() { return null; }
    }
   
    Method method = TargetClass.class.getMethod("getData", null);

    Type returnType = method.getGenericReturnType();

    if(returnType instanceof ParameterizedType){
        ParameterizedType type = (ParameterizedType) returnType;
       
        Type rawType = type.getRawType() ;
        Class rawTypeClass = (Class) rawType ;
       
        Type[] typeArguments = type.getActualTypeArguments();
       
        System.out.println("returnType = " + rawTypeClass );

        if ( List.class.isAssignableFrom(rawTypeClass)  ) System.out.println("Is a list");
       
        for(Type typeArgument : typeArguments){
            Class typeArgClass = (Class) typeArgument;
            System.out.println("typeArgClass = " + typeArgClass);
        }

this prints out:

returnType = interface java.util.List
Is a list
typeArgClass = class java.lang.String

Which is correct!

The article what gets the credit for this is here: Java Reflection: Generics by Jakob Jenkov.

Friday 20 July 2012

"Gang of Four" design paterns

There are times when you find something on the web and you go are that's useful! There are several reasons for this revelation, in this case it is a reminder that there are good ways and bad ways to write your code.

This article is one of those salutary reminders that we can all do better. So I have posted a link to the here with a short synopsis so I can find it when I need to be reminded.


Design patterns provide solutions to common software design problems. In the case of object-oriented programming, design patterns are generally aimed at solving the problems of object generation and interaction, rather than the larger scale problems of overall software architecture. They give generalised solutions in the form of templates that may be applied to real-world problems.
Design patterns are a powerful tool for software developers. However, they should not be seen as prescriptive specifications for software. It is more important to understand the concepts that design patterns describe, rather than memorising their exact classes, methods and properties. It is also important to apply patterns appropriately. Using the incorrect pattern for a situation or applying a design pattern to a trivial solution can overcomplicate your code and lead to maintainability issues.

The Gang of Four are the authors of the book, "Design Patterns: Elements of Reusable Object-Oriented Software". This important book describes various development techniques and pitfalls in addition to providing twenty-three object-oriented programming design patterns. The four authors were Erich Gamma, Richard Helm, Ralph Johnson and John Vlissides.

The full article by , is published at http://www.blackwasp.co.uk/GofPatterns.aspx but the types of patterns he describes are listed here:

Creational Patterns

The first type of design pattern is the creational pattern. Creational patterns provide ways to instantiate single objects or groups of related objects. There are five such patterns:
  • Abstract Factory. The abstract factory pattern is used to provide a client with a set of related or dependant objects. The "family" of objects created by the factory are determined at run-time.
  • Builder. The builder pattern is used to create complex objects with constituent parts that must be created in the same order or using a specific algorithm. An external class controls the construction algorithm.
  • Factory Method. The factory pattern is used to replace class constructors, abstracting the process of object generation so that the type of the object instantiated can be determined at run-time.
  • Prototype. The prototype pattern is used to instantiate a new object by copying all of the properties of an existing object, creating an independent clone. This practise is particularly useful when the construction of a new object is inefficient.
  • Singleton. The singleton pattern ensures that only one object of a particular class is ever created. All further references to objects of the singleton class refer to the same underlying instance.

Structural Patterns

The second type of design pattern is the structural pattern. Structural patterns provide a manner to define relationships between classes or objects.
  • Adapter. The adapter pattern is used to provide a link between two otherwise incompatible types by wrapping the "adaptee" with a class that supports the interface required by the client.
  • Bridge. The bridge pattern is used to separate the abstract elements of a class from the implementation details, providing the means to replace the implementation details without modifying the abstraction.
  • Composite. The composite pattern is used to create hierarchical, recursive tree structures of related objects where any element of the structure may be accessed and utilised in a standard manner.
  • Decorator. The decorator pattern is used to extend or alter the functionality of objects at run-time by wrapping them in an object of a decorator class. This provides a flexible alternative to using inheritance to modify behaviour.
  • Facade. The facade pattern is used to define a simplified interface to a more complex subsystem.
  • Flyweight. The flyweight pattern is used to reduce the memory and resource usage for complex models containing many hundreds, thousands or hundreds of thousands of similar objects.
  • Proxy. The proxy pattern is used to provide a surrogate or placeholder object, which references an underlying object. The proxy provides the same public interface as the underlying subject class, adding a level of indirection by accepting requests from a client object and passing these to the real subject object as necessary.

Tuesday 19 June 2012

Using Apache-IVY : Missing dependency

This is just in case I loose this reference.
I had an error with my Ivy dependencies which reported "org.eclipse.persistence#org.eclipse.persistence.jpa;2.2.0: not found". It took me a while to find it but this post on Stack-Overflow helped.
It means that the standard Maven repositories do not hold this JAR so I have connected to the Eclipse Maven repository @ http://download.eclipse.org/rt/eclipselink/maven.repo/.

How?

Well my ivysettings.xml has this setting in it <ibiblio name="Eclipse-libraries"   m2compatible="true" root="http://download.eclipse.org/rt/eclipselink/maven.repo/" /> and looks like this:

<!--
   Licensed to the Apache Software Foundation (ASF) under one
   or more contributor license agreements.  See the NOTICE file
   distributed with this work for additional information
   regarding copyright ownership.  The ASF licenses this file
   to you under the Apache License, Version 2.0 (the
   "License"); you may not use this file except in compliance
   with the License.  You may obtain a copy of the License at

     http://www.apache.org/licenses/LICENSE-2.0

   Unless required by applicable law or agreed to in writing,
   software distributed under the License is distributed on an
   "AS IS" BASIS, WITHOUT WARRANTIES OR CONDITIONS OF ANY
   KIND, either express or implied.  See the License for the
   specific language governing permissions and limitations
   under the License.   
-->
<ivysettings>
    <properties file="${ivy.settings.dir}/ivysettings.properties"/>
   
    <settings defaultResolver="embedplaysafe" />
   
    <!-- Where the Cache is placed -->
    <!-- <caches defaultCacheDir="${ivy.settings.dir}/ivy-cache" /> -->
    <caches defaultCacheDir="${defaultCache.dir}" />
   
    <resolvers>
        <!-- Path is important as this is the final repository -->
        <chain name="embedplaysafe"
               returnFirst="true"> <!-- if a revision is found in the filesystem then ivyrep will not be queried -->
            <!--
            It is a filesystem resolver, so looks at a directory structure to retrieve the artifacts.
            This one is configured to look in the repository sub directory of the directory that contains the ivysettings.xml file
             -->
            <filesystem name="local">
                <artifact pattern="${repository.dir}/[type]/[artifact]-[revision].[ext]" />
                <ivy pattern="${repository.dir}/[type]/[module]-[revision].xml" />
            </filesystem>
            <!--  See http://www.buildmeister.com/articles/escape_from_jar_hell_with_apache_ivy_the_agile_dependency_manager -->
            <!-- 
            <url name="buildmeister"> 
               <ivy pattern="http://m2.buildmeister.com/[module]/[revision]/ 
                ivy-[revision].xml" /> 
               <artifact pattern="http://m2.buildmeister.com/[module]/[revision]/ 
                [artifact]-[revision].[ext]" /> 
            </url>
            -->
            <!--  See http://stackoverflow.com/questions/1033859/ivy-via-nexus-proxy  -->
            <!-- It looks in the ibiblio maven repository to retrieve the artifacts.  -->
            <!--   -->
            <ibiblio name="uk-libraries"         m2compatible="true" root="http://uk.maven.org/maven2" />
            <ibiblio name="global-libraries"     m2compatible="true" usepoms="true" />
            <ibiblio name="Eclipse-libraries"   m2compatible="true" root="http://download.eclipse.org/rt/eclipselink/maven.repo/" />
          
        </chain>
    </resolvers>

</ivysettings>


I hope this helps you.

Monday 18 June 2012

Java 7 classpath broken on Windows XP

Please file under "for F*cks sake!!!"

It seems that the ability to assign a wild card as a class path when setting up a Java comand-line script is broken for Java 1.7 and windows users (On XP certainly).

Previously you could type .... java -cp "somewhere/*"
WHICH would do the trick now you have to add a magic character to make it work.
SO the command becomes java -cp "somewhere/*;"

Just file under GRRRR!

Or see this handy post by someone far less annoyed than I am.
http://stackoverflow.com/questions/9195073/broken-wildcard-expansion-for-java7-commandline-on-windows7

Thursday 31 May 2012

Version Numbering


So many times I hear developers arguing about how to label versions so here is the "right" way to do it ... well a widely accepted way!

Software should be released with a version number based on the Apache Portable Runtime Project version guidelines. In summary, the version is denoted as three integers in the format of MAJOR.MINOR.PATCH.

Major versions are incompatible at the API level, as they can include any kind of change.
Minor versions are compatible with older versions at the API and binary level, and they can introduce new functions or deprecate old ones.
Patch versions are perfectly compatible, and they are released to fix defects.

Here are some examples to demonstrate the compatibility:
Original VersionNew VersionCompatible?
2.2.32.2.4Yes
Compatibility across patch versions is guaranteed.
2.2.32.2.1Yes
Compatibility across patch versions is guaranteed.
2.2.32.3.1Yes
Compatibility with later minor versions is guaranteed.
2.2.32.1.7No
Compatibility with prior minor versions is not guaranteed.
2.2.33.0.0No
Compatibility with different major versions is not guaranteed.
2.2.31.4.7No
Compatibility with different major versions is not guaranteed.
Note: while some of the cells say "no", it is possible that the versions may be compatible, depending very precisely upon the particular APIs used by the application.

Patch Versions

To retain perfect source and binary compatibility, a patch release can only change function implementations. Changes to the API, to the signatures of public functions, or to the interpretation of function parameters is not allowed. Effectively, these releases are pure bug fix releases.

Minor Versions

Minor releases can introduce new functions, new symbolic and enumerated constants, and deprecate existing functions. In practice, this will not be a problem since upgrading to newer versions is always safe.

Major Versions

Any kind of change can be made during a major version release. Particular types of changes that might occur:
  • remove or change constants
  • remove (deprecated) functions
So you might find that your code stops working completly.

Minor Versions

Minor Versions
Minor 

Data Replication for Stores

(Extract from an article on Oracle's Blog)

A tough problem for store systems is reliably moving data between the home office and stores in both directions. There are many solutions to this problem, each with its own positives and negatives. One solution is using the open-source software SymmetricDS, which was created for this very problem during the Oracle Retail POS implementation at BigLots. The original developers formed JumpMind, a company specializing in helping retailers use open-source to solve difficult problems.

SymmetricDS is an open-source, web-enabled, database independent, data synchronization software application. It uses web and database technologies to replicate tables between relational databases in near real time. SymmetricDS is database agnostic and can even synchronize data between different types of databases.
The idea of  SymmetricDS came from the need to synchronize many small, inexpensive databases at stores to a single, large, more expensive one at a corporate location. We needed something that would trickle sales data over a slow network and survive outages

It is possible to host SymmetricDS under Tomcat but it runs very nicely under Jetty as a single command line task.

(More..) (And on facebook...)

Log4j - Tricks

This post will grow as I find more little tricks and gotchas...

  1. Changing the timestamp format in the appender.
    Add %d{dd MMM yyyy HH:mm:ss,SSS} sooner than just %d and then edit the bits out you don't like.

Log4j manual...

Wednesday 23 May 2012

"Cmd here" in windows 7

In Win XP I found very useful the power toy CmdHere to open a command window in the current folder.

Q: So what is the equivalent in Windows 7?
A: Hold the Shift key down while right-clicking.  You should see an entry "Open Command Window Here" appear.

Wednesday 7 March 2012

Facebook Share button

An example of the share button
The Share Button.

If you want to add a share button to your site all you need to do is add a small amount of script.
Simply add:

<a name="fb_share"></a> 
<script src="http://static.ak.fbcdn.net/connect.php/js/FB.Share" 
        type="text/javascript">
</script>
 
and you're done!

Look at the developer information for more details.

However it can sometimes go wrong and you don't see the text you expect.
According to Facebook, it scrapes your page every 24 hours to ensure the description (and other share data) are up to date. However, you can manually refresh it by entering the post URL into the Facebook URL Linter. Entering  your url onto this page will cause Facebook to update its cache of your page and you will get a diagnostic of what Facebook sees when they look at your page.

This would be great except Facebook are deprecating the share button in favour of like ...

Thursday 16 February 2012

Configuring MODx to run under Tomcat

If you read my article on running PHP under tomcat and debugging it using eclipse you should be up to speed on getting PHP running under Tomcat. An earlier post detailed how to set up Drupal on Tomcat.
This is exactly the same deal!
SO these are the steps:
  1. Set up a folder for your MODx site as a Tomcat Web project where your website folder is "htmldocs" (as it helps you when referring to MODx documentation).
  2. If you have an install of a MODx site which is running under Apache this part is a doddle.
    Simply place ALL the site files into the htmldocs folder.
  3. Start up Tomcat;
  4. Browse to the site & hurah you see your site!
  5. However if you have an index.html file in your root folder you may not see it if index.html comes before your index.php in your welcome file list.
    Either adjust your welcome list or delete the index.html file.
  6. Now when you browse to your index.php page you will see your site.
    Assuming you have your db permissions set up for the web user.
    The php debugging here is a great way to find out where to look as ModX kindly tells you the file and line number where the db access is.
  7. HOWEVER at this point you will find you can see index.php and any other php pages but ModX generates URLs with a .html extension which Tomcat just says do not exist.
    These are " Friendly URLs" in MODx talk.
    This is similar to problems that people running under Apache Httpd encounter.
    If you look for your page on the admin pages (See picture).

    Each page has a number Home=1, "About Us"=12, Solutions=2.
    Yo should be able to get to the pages in question by using the URL <site path>/index.php?id=<doc number>.
    As does using the URL alias seen when editing the resource which is the file refered to by the "Friendly URLs". Try the URL <site path>/index.php?q=<freindly html doc name> (ie. <site path>/index.php?q..
  8. SO lets fix this so the  "Friendly URLs" work.
    We can turn them off but then they are not SEO, having this feature is arguably the most powerful way to have MODx change your urls. When you're using this method, your MODx pages will look and feel just like they were uploaded into a directory on a web server. This is good news for bookmarking and SEO.
    To do this you have to edit your .htaccess file.
    The first hitch will be editing it as eclipse just hides this resource (fix here).

Wednesday 8 February 2012

Tip of the Day - Eclipse Incremental compiler for Java (ECJ)

Try converting your build scripts to use the Eclipse Incremental compiler for Java (ECJ).
I found it in use within the Liferay build scripts.
ECJ, the Eclipse Compiler for Java, is an open source incremental compiler used by the Eclipse JDT. It is an option for Liferay builds and is in many cases faster than Javac or Jikes. The jar for ECJ (ecj.jar) is included in Liferay release 4.4.0 and later and more importantly in Ant 1.8.2 and upwards.
To add it to your Eclipse version of ANT add a global path setting to point to the ecj.jar, which should be where you defined the Tools.jar file to be included.
To enable ECJ in your build you have to set the compiler attribute on the javac task.
Like this:
        <javac
            classpathref="${javac.classpathref}"
            compiler="${javac.compiler}"
            debug="${javac.debug}"
...

In a LifeRay build this is set up in your build.properties as "javac.compiler=org.eclipse.jdt.core.JDTCompilerAdapter" which in turn can be detected using
<whichresource resource="/org/eclipse/jdt/core/JDTCompilerAdapter.class" property="ecj.compiler" />
So you know if you have it installed.


Tuesday 7 February 2012

Running LifeRay as a windows service.

This is an ongoing investigation.
SO far the best steps seem to be:
  1. Copy from a tomcat 7 set up the Tomcat7w.exe and all the associated <tomcat>\bin\*.bat files into your Liferay distribution, as they don't seem to come as standard.
  2. Edit the service.bat so that it contains the following lines:
    rem Set default Service name
    set SERVICE_NAME=LiferayTomcat7
    set PR_DISPLAYNAME=Liferay 6.1


    (lines 77-79).
  3. Install the service as normal (here...).
  4. Add the setting in the registry...
    In HKEY_CURRENT_USER\Software\Microsoft\Windows\CurrentVersion\Run
    Add a setting called "LifeRayMonitoring" like this:
    "C:\development\Java\tomcat\liferay-portal-6.1.0\tomcat-7.0.23\bin\Tomcat7w.exe" //MS//LiferayTomcat7
    This will start the monitoring service for you.
  5. Now the part I am less sure about. The memory settings.
    This is done by editing the Java Options on the Java Tab.
    It should read:
    -Djava.io.tmpdir=C:\development\Java\tomcat\liferay-portal-6.1.0\tomcat-7.0.23\temp
    -Djava.util.logging.manager=org.apache.juli.ClassLoaderLogManager
    -Djava.util.logging.config.file=C:\development\Java\tomcat\liferay-portal-6.1.0\tomcat-7.0.23\conf\logging.properties
    -Xms512M
    -Xmx1024M
    -XX:MaxPermSize=256m
    -Dfile.encoding=UTF8
    -Duser.timezone=GMT

    -agentlib:jdwp=transport=dt_socket,server=y,suspend=n,address=8000

    The first part is created when you set up the service when startup.bat was run.
    the memory settings are those recommended in the admin manual.
    The three starting with -agentlib are to allow remote debugging against port 8000.
  6. No start remote debugging your portlets (See...)
This is a work in progress but I think it is accurate.

Usefull??? jps - Java Virtual Machine Process Status Tool


jps - Java Virtual Machine Process Status Tool
This tool allows you to list the status of all the JVMs you have running on your PC.
This sounds great until you try to use it.
Then you find it is unable to get any information.
But it is still worth a try...

type <java-home>\bin\jps -mVvl

Friday 3 February 2012

Adding PHP Validation to existing projects

So you have some PHP in a project and it is coded wrong!
What happens???
Well I will tell you it just crashes and ruins your day and you spend an hour looking for the problem, that is what.
Well you need to add the PDT nature to the project but how??
Well there is the hard way as seen here https://www.globalways.net/blog/archives/18-Converting-existing-eclipse-projects-into-PDT-projects.html ... which does work BTW!
Or the easy way....
  1. In Eclipse select the project;
  2. Right mouse click -->Configure-->Add PHP Support...

And that is it all PHPs are now validated ... happy days!

Wednesday 1 February 2012

Using Tomcat Native DLL

Most of the time this error message goes unnoticed:

INFO: The Apache Tomcat Native library which allows optimal performance in
production environments was not found on the java.library.path: C:\...


Time to deal with it!

Downloaded tcnative-1.dll from http://www.apache.org/dist/tomcat/tomcat-connectors/native/1.1.22/binaries/win64/

Here you'll find the binaries for Windows 64-bit platform.

  • x64 is for AMD64/EMT64 architecture (Most current 64 bits architectures).
  • ia64 is for Intel IA64 architecture (Itanium only). 
If you pick the wrong one you will recieve a warning mesage saying you have the wrong architecture.
Go get the other and restart.

I placed mine in the JDK folder as follows "C:\development\java\jdk1.6.0_25\bin" so that it will be reused for all Tomcat instances.

I have notices about a 10% speed up but that is only on the process start. Begining Liferay with the dll gave "INFO: Server startup in 95164 ms", while with out gave "INFO: Server startup in 101845 ms".
Which is 6.7 seconds faster!
I'll have that thanks!

Tuesday 31 January 2012

Introducing Quercus, a Java-based PHP framework

Quercus is a new approach to authoring Web services and applications using a mixture of Java™ technology and PHP. With the Quercus framework, Java and PHP are integrated with each other, thus allowing you to conveniently incorporate versatile Java libraries like Spring and Hibernate into applications.

Read the full article on the IBM website.

While I am finding out what I can about Quercus it seems to be the PHP engine driving PHP in Liferay.
It seems to be held in the JAR files quercus.jar, resin-util.jar, and javamail-141.jar.

The php.ini file is used to configure the PHP behavior, like setting directories, file paths, changing sessions, and so on. This file can be specified in the web.xml file.
SOme thing like this:

<init-param>
 <param-name>ini-file</param-name>
       <param-value>WEB-INF/php.ini</param-value>
</init-param>


If this is associated with the QuercusServlet, I do not know.

Disabling the Public & Private Pages feature in Liferay

When you log into a Liferay portal you get a menu on the Dock Bar (at the head of the page) which allows you to create Public and private pages.

Sometimes you want to turn this feature off.
Add to your portal-ext.properties file the following settings and restart your portal.
For the tomcat bundle, you need to create it in: {install directory}/liferay-{version}/tomcat-{version}/webapps/ROOT/WEB-INF/classes/portal-ext.properties.

When you have found the file add:

#
# Disabling user private and public pages
#

layout.user.private.layouts.enabled=false
layout.user.private.layouts.modifiable=false
layout.user.private.layouts.auto.create=false

layout.user.public.layouts.enabled=false
layout.user.public.layouts.modifiable=false
layout.user.public.layouts.auto.create=false

This is taken from this post on the Liferay Forum.
See here for details on common Portal properties.

Thursday 26 January 2012

What process is using that port?

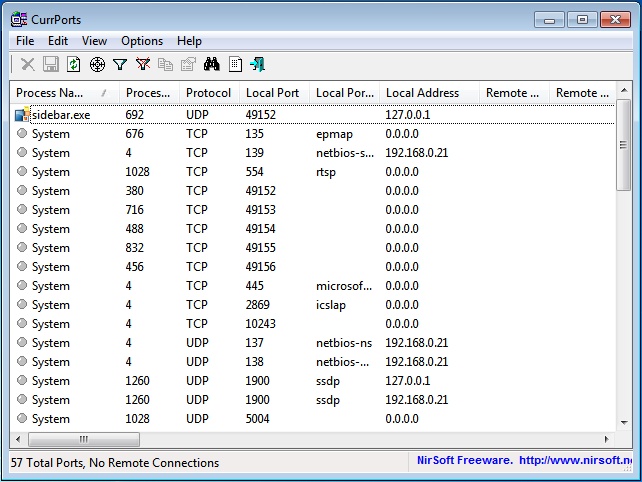
CurrPorts from Nirsoft
Ever wondered which process is using the port you are intrested in?
While a swift "netstat -an" will give you a list of open ports it will not tell you which one is attached to which process.
So try the hard way.... 
Or Microsoft's Port Reporter...

Or the easy way with a small freeware Utility called CurrPorts from Nirsoft that displays all open ports on windows.

Download CurrPorts to your computer:
32Bit version: http://www.nirsoft.net/utils/cports.zip
64Bit version: http://www.nirsoft.net/utils/cports-x64.zip
Unpack the .zip file and double click on the file cports.exe to start CurrPorts. The application will show you a list of all open ports and offers the ability to apply filters on the list.

Thanks to faqforge.com for this gem.

Setting up Eclipse check list (Part 6) - PHP Web development with Tomcat

If you like Xdebug, please consider a donation.
At this point we have to ensure that we have PHP running fine in Tomcat.
  1. Create a new JSP Project called jsp-php.
    Give it a site folder called /webroot.
  2. Give it an index.html file and run the site up to see if it works. (which it should).
  3. Now create it a file (& folder) called /jsp/default.jsp which should have some thing like:

    <%@ page language="java" contentType="text/html; charset=ISO-8859-1"
        pageEncoding="ISO-8859-1"
        import="java.util.Date"
        %>
    <!DOCTYPE html PUBLIC "-//W3C//DTD HTML 4.01 Transitional//EN" "http://www.w3.org/TR/html4/loose.dtd">
    <html>
        <head>
            <meta http-equiv="Content-Type" content="text/html; charset=ISO-8859-1">
            <link href='http://fonts.googleapis.com/css?family=Cuprum' rel='stylesheet' type='text/css'>
            <link href="../basic.css"  rel="stylesheet" type="text/css" media="screen" />
            <title>Insert title here</title>
        </head>
        <body>
            <h1>New JSP Page</h1>
            <%
            Date now = new Date();
            %>
            Now = <%=now.toString() %>
        </body>
    </html>


    in it.

    Test it to make sure you haven't f****d up Tomcat.
  4. Now create a file (&folder called) /php/index.php which should have something like this:
    <!DOCTYPE html PUBLIC "-//W3C//DTD HTML 4.01 Transitional//EN" "http://www.w3.org/TR/html4/loose.dtd">
    <html>
        <head>
            <meta http-equiv="Content-Type" content="text/html; charset=ISO-8859-1">
            <link href='http://fonts.googleapis.com/css?family=Cuprum' rel='stylesheet' type='text/css'>
            <link href="../basic.css"  rel="stylesheet" type="text/css" media="screen" />
            <title>Insert title here</title>
        </head>
        <body>
            <h1>New PHP Page</h1>
    <p><a href="phpinfo.php">PHP Info</a></p>
    <?php        
            $brush_price = 5;
           
            echo "<table border=\"1\" align=\"center\">";
            echo "<tr><th>Quantity</th>";
            echo "<th>Price</th></tr>";
            for ( $counter = 10; $counter <= 100; $counter += 10) {
                echo "<tr><td>";
                echo $counter;
                echo "</td><td>";
                echo $brush_price * $counter;
                echo "</td></tr>";
            }
            echo "</table>";
    ?>
        </body>
    </html>


    Give it a run and check it works.
  5. Now create a phpinfo.php page.
    Browse to it and ensure you have the correct PHP server and ini file in use.
    Look out for the Zend logo at the bottom.
  6. Assuming this is fine and JSP & PHP both run now we need to set up debugging.
    This is done initially by adding the following options to the top of your php.ini file:

    [PHP]

    ; XDEBUG
    zend_extension = C:\development\php\php_5.3.9\ext\php_xdebug-2.1.2-5.3-vc9.dll
    ; Adding these lines will stop you debugging when calling Eclipse/PHP/Run as php script
    xdebug.default_enable=On
    xdebug.remote_enable=On
    xdebug.remote_host=127.0.0.1
    xdebug.remote_port=9000;
    xdebug.remote_handler="dbgp";
    xdebug.remote_autostart=off


    Now it is possible that all these parts need to be in a [xdebug] section but the jury is still out on that one.
    Please note that from this point onwards this php.ini is useless for "run as script".


    For more on these options go to http://xdebug.org/docs/remote.

    Be extra careful with xdebug.remote_host, this is the host where you develop and run your Eclipse, and PHP will try and connect to Eclipse when debugging is enabled.

    Also make sure that the zend_extension part was not added automatically by the installation, if it was don't add it again.

    If there is any mention of the Zend debugger in you php.ini file, you will have to comment that out.

    Restart Tomcat or whatever web server you're using and make sure the Xdebug installation was correct by running a simple PHP script that contains phpinfo() and searching for "xdebug".
  7. Now the tricky part, Eclipse has to be configured to accept debugging sessions from XDebug.


    Follow the steps below:

    1. Open your project in Eclipse(With PDT installed);
    2. In the main menu select Project->Properties;
    3. On the left side of the window select "PHP Debug" and then click on "Configure Workspace Settings"
    4. On the "PHP Debugger" dropdown select Xdebug and click "Apply";
    5. Click "Configure" to the right of Xdebug in the same window.
    6. Select Xdebug and click "Configure".
    7. On the "Accept remote session(JIT)" select "any" and click "OK". This is extremely important and this is where most people get stuck.

    That's it, Eclipse is now configured.

    Your PHP Preferences should look like this:

    Please note the PHP Executable  is set.
    If it isn't the debugging ISN'T going to work.
    If you choose the incorrect debugger, your project might not execute at all or could execute, but not stop at breakpoints.
    If nothing appears in your drop list it is probably because Eclipse is attempting to help you.
    Only PHP executables that are compatible with your selected PHP Debugger appear in this drop list. Select the correct one and the list populates (/facepalm).
  8. You should be able to invoke debug as... --> PHP Script on any of the scripts.
  9. Now all we need is to be able to be in control of our debugging sessions.
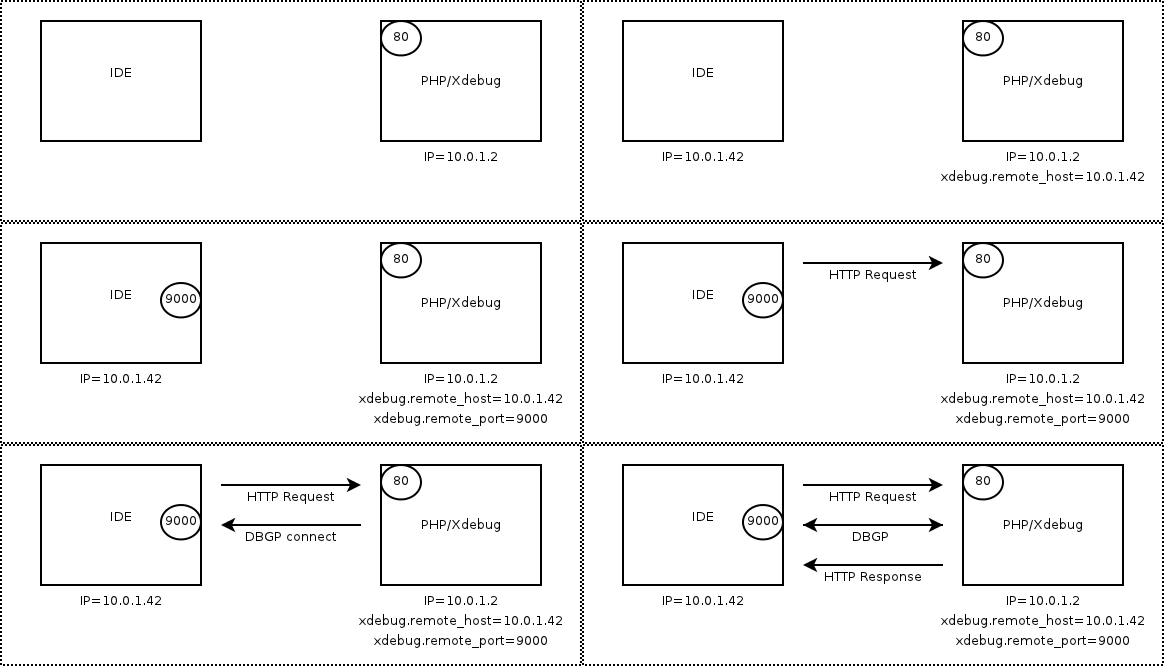
    To do this you have to tell the IDE that you are attempting to connect to it.
    The comms works something like this:


    To connect to the IDE/debugger is to add an option to the URL as follows: "http://localhost/jsp-php/php/index.php?XDEBUG_SESSION_STOP_NO_EXEC=ECLIPSE_DBGP&KEY=13275950773634"

    The absolutely vital part of this is the ?XDEBUG_SESSION_START=ECLIPSE_DBGP parameter.

    An easy (and reliable) way to get this to work if to invoke debug as... --> PHP Web Page. This is by far the best way to proceed as it helps eclipse know which PHP maps to which URL.

    Make sure you have [_] Open in Browser un-ticked so that it invokes your default web browser.
    When you do so it will show the following to you...

    The file I am invoking is phpinfo.php and it appears as http://localhost/jsp-php/webroot/php/phpinfo.php which is not quite right. In this case it is http://localhost/jsp-php/php/phpinfo.php clicking OK will show the script and if you have a break point set then it appears.
    I believe this gets round the problem of the path of the file not being what we need it to be.
    The URL that appears in the browser is ... http://localhost/jsp-php/php/phpinfo.php?XDEBUG_SESSION_START=ECLIPSE_DBGP&KEY=13282801757752

    It is also importat NOT to have two copies of eclipse running at once as they will both be listening on the same port! Obvious when pointed out but that doesn't stop you doing it.

    For this we will need to install a Firefox extension called "easy Xdebug"(yes Firefox, you're not developing PHP in IE are you?).
    The easiest way to set this up is using a Firefox Plugin called "Easy XDebug".
    When installed you will find a little icon on the foot of each page.

    But turning it on is not obvious. Go to Firefox;alt;View-->Toolbars-->Addons Toolbar.
  10. Now put a break point in your file.
  11. Click the little bug icon and refresh the page.
    The icon changes as follows:
  12. Step through the code with coding and variable fun and goodness;
  13. Click the icon to turn it off.
    Please not it won't work for other browsers just the one you are in.
 And that's it JSP/PHP & Tomcat in one neat package.


<<Back  | Next>>

Install and configure PHP on your machine

This might seem like an easy thing to do but you would not believe the issues I have had while setting up PHP on a 64bit W7 machine.
The intention is to run it under Tomcat as detailed elsewhere, so this is a non standard install which I also want to be able to debug through eclipse.
The steps are as follows:
  1. Down load the correct version of PHP.
    I went with the Thread safe 5.3.9 version.
    I'm not sure if that was the right choice but I followed the advice listed here. My thoughts were that I want apache/tomcat to handle multiple threads so I expected PHP to do the same.
    Note the debug pack seems to be related to creating stack traces when PHP crashes.
  2. During the install it asks where to install, I wanted to keep it out of the program files directory so I placed it in "C:\development\php\php_5.3.9\".
  3. During the install it asks for the web server set up.
    As Tomcat is not present and I have no Apache or ISS I opted for the Other CGI version.
    (I am not sure at this point if that is causing problems later with debugging).
  4. After the install you should be able to open a command prompt and check every thing is working.
    Simply type php -i  and this will dump the PHP info to screen.
    Running a PHP script is now as simple as "php myfile.php". 
  5. For the next step create a dump of this info:
    php -i > phpinfo.txt
  6. As I want to debug PHPs I need more software XDebug to be exact.
    (There is an other debugger called Zend which looks nice but it is a commercial package and I can't get it at this time.)
    So where do you go to get XDebug ... http://xdebug.org/find-binary.php.
    Take the captured output (phpinfo.txt) and post it to the form on the above page.
  7. Now follow its instructions.
    It should tells you which dll to download (plus a link) and where to put it (the /ext folder) and what to place into the php.ini file.
    Mine ended up looking like this:

    [PHP]
    ; XDEBUG
    zend_extension = C:\development\php\php_5.3.9\ext\php_xdebug-2.1.2-5.3-vc9.dll

    And you can check it is a loaded module by typing php -m which will dump the following:

    ...
    tidy

    tokenizer
    wddx
    xdebug
    xml
    xmlreader
    xmlrpc
    xmlwriter
    zip
    zlib
    [Zend Modules]
    Xdebug
  8. To confirm the set up redo steps 4 and 5 and you should get the message "You're already running the latest Xdebug version".
So far so good!

You now have PHP and its debugger installed.
Now on to gettng it to work within eclipse>>.

PHP running in Tomcat

It is fun to have PHP running in Tomcat and not too hard to achieve. Especially if you follow the instructions at PHP/Java Bridge or even here.

  1. Don't forget to Install and configure PHP on your machine or it won't work at all - duh!;
  2. From the JavaBridge Project add JavaBridge.jar, php-script.jar and php-servlet.jar to to the <tomcat home>/lib folder. (Do not be tempted to placed them in the ext folder as it will not work).
  3. Edit the <tomcat-home>/conf/web.xml file as follows:

        <filter>
            <filter-name>PhpCGIFilter</filter-name>
            <filter-class>php.java.servlet.PhpCGIFilter</filter-class>
        </filter>
        <!--
        <filter-mapping>
            <filter-name>PhpCGIFilter</filter-name>
            <url-pattern>/*</url-pattern>
        </filter-mapping>
        -->
        <!-- the following adds the JSR223 listener. Remove it if you don't want to use the JSR223 API -->
        <listener>
            <listener-class>php.java.servlet.ContextLoaderListener</listener-class>
        </listener>

        <!-- the back end for external (console, Apache/IIS-) PHP scripts; remove it if you don't need this -->
        <servlet>
            <servlet-name>PhpJavaServlet</servlet-name>
            <servlet-class>php.java.servlet.PhpJavaServlet</servlet-class>
        </servlet>

        <!-- runs PHP scripts in this web app; remove it if you don't need this -->
        <servlet>
            <servlet-name>PhpCGIServlet</servlet-name>
            <servlet-class>php.java.servlet.fastcgi.FastCGIServlet</servlet-class>
            <load-on-startup>0</load-on-startup>
        </servlet>
       
        <servlet-mapping>
            <servlet-name>PhpJavaServlet</servlet-name>
            <url-pattern>*.phpjavabridge</url-pattern>
        </servlet-mapping>

        <servlet-mapping>
            <servlet-name>PhpCGIServlet</servlet-name>
            <url-pattern>*.php</url-pattern>
        </servlet-mapping>


    And at the end of the file:
        <welcome-file-list>
            <welcome-file>index.html</welcome-file>
            <welcome-file>index.htm</welcome-file>
            <welcome-file>index.jsp</welcome-file>
            <welcome-file>index.php</welcome-file>
        </welcome-file-list>


  4. Create a new Tomcat project;
  5. Add a index.php file with this contents:

    <?php phpinfo();?>

  6. Start the server up and browse to it.
An alternate is to use Quercus which is a Java implementation of PHP which apparently supports the DBGp protocol which would be great for use with Liferay as it has the Quercus servlet as its default method of supporting PHP. The only problem is finding out how to debug the thing!!!