Showing posts with label PHP. Show all posts

Monday, 21 October 2013

Something done in my down time: "Allrangecombat.co.uk"

Allrangecombat Website
I have been a long term student of martial arts and when ask by my senior instructor whether there anything I could do to assist with his website, of course I said yes.

The site is available at allrangecombat.co.uk and allrangecombat.com and has been hosted on a relatively cheep host iPage.
The whole site took about two days to put together and much of that was messing about unnecessarily with uploading content.
The site is based on a nice little CMS called MODX which is 100% PHP which is installable as a standard extra on iPage. While the CSS is based on MetroUI which attempts to emulate Windows Eight's look and feel. I have used it here to provide a CSS which adapts to mobile devices.

Naturally I have attached my own club site to this one as a mini-site: allrangecombat.co.uk/bath.
Enjoy!
Better still come training!

Friday, 3 February 2012

Adding PHP Validation to existing projects

So you have some PHP in a project and it is coded wrong!
What happens???
Well I will tell you it just crashes and ruins your day and you spend an hour looking for the problem, that is what.
Well you need to add the PDT nature to the project but how??
Well there is the hard way as seen here https://www.globalways.net/blog/archives/18-Converting-existing-eclipse-projects-into-PDT-projects.html ... which does work BTW!
Or the easy way....
  1. In Eclipse select the project;
  2. Right mouse click -->Configure-->Add PHP Support...

And that is it all PHPs are now validated ... happy days!

Tuesday, 31 January 2012

Introducing Quercus, a Java-based PHP framework

Quercus is a new approach to authoring Web services and applications using a mixture of Java™ technology and PHP. With the Quercus framework, Java and PHP are integrated with each other, thus allowing you to conveniently incorporate versatile Java libraries like Spring and Hibernate into applications.

Read the full article on the IBM website.

While I am finding out what I can about Quercus it seems to be the PHP engine driving PHP in Liferay.
It seems to be held in the JAR files quercus.jar, resin-util.jar, and javamail-141.jar.

The php.ini file is used to configure the PHP behavior, like setting directories, file paths, changing sessions, and so on. This file can be specified in the web.xml file.
SOme thing like this:

<init-param>
 <param-name>ini-file</param-name>
       <param-value>WEB-INF/php.ini</param-value>
</init-param>


If this is associated with the QuercusServlet, I do not know.

Thursday, 26 January 2012

Setting up Eclipse check list (Part 6) - PHP Web development with Tomcat

If you like Xdebug, please consider a donation.
At this point we have to ensure that we have PHP running fine in Tomcat.
  1. Create a new JSP Project called jsp-php.
    Give it a site folder called /webroot.
  2. Give it an index.html file and run the site up to see if it works. (which it should).
  3. Now create it a file (& folder) called /jsp/default.jsp which should have some thing like:

    <%@ page language="java" contentType="text/html; charset=ISO-8859-1"
        pageEncoding="ISO-8859-1"
        import="java.util.Date"
        %>
    <!DOCTYPE html PUBLIC "-//W3C//DTD HTML 4.01 Transitional//EN" "http://www.w3.org/TR/html4/loose.dtd">
    <html>
        <head>
            <meta http-equiv="Content-Type" content="text/html; charset=ISO-8859-1">
            <link href='http://fonts.googleapis.com/css?family=Cuprum' rel='stylesheet' type='text/css'>
            <link href="../basic.css"  rel="stylesheet" type="text/css" media="screen" />
            <title>Insert title here</title>
        </head>
        <body>
            <h1>New JSP Page</h1>
            <%
            Date now = new Date();
            %>
            Now = <%=now.toString() %>
        </body>
    </html>


    in it.

    Test it to make sure you haven't f****d up Tomcat.
  4. Now create a file (&folder called) /php/index.php which should have something like this:
    <!DOCTYPE html PUBLIC "-//W3C//DTD HTML 4.01 Transitional//EN" "http://www.w3.org/TR/html4/loose.dtd">
    <html>
        <head>
            <meta http-equiv="Content-Type" content="text/html; charset=ISO-8859-1">
            <link href='http://fonts.googleapis.com/css?family=Cuprum' rel='stylesheet' type='text/css'>
            <link href="../basic.css"  rel="stylesheet" type="text/css" media="screen" />
            <title>Insert title here</title>
        </head>
        <body>
            <h1>New PHP Page</h1>
    <p><a href="phpinfo.php">PHP Info</a></p>
    <?php        
            $brush_price = 5;
           
            echo "<table border=\"1\" align=\"center\">";
            echo "<tr><th>Quantity</th>";
            echo "<th>Price</th></tr>";
            for ( $counter = 10; $counter <= 100; $counter += 10) {
                echo "<tr><td>";
                echo $counter;
                echo "</td><td>";
                echo $brush_price * $counter;
                echo "</td></tr>";
            }
            echo "</table>";
    ?>
        </body>
    </html>


    Give it a run and check it works.
  5. Now create a phpinfo.php page.
    Browse to it and ensure you have the correct PHP server and ini file in use.
    Look out for the Zend logo at the bottom.
  6. Assuming this is fine and JSP & PHP both run now we need to set up debugging.
    This is done initially by adding the following options to the top of your php.ini file:

    [PHP]

    ; XDEBUG
    zend_extension = C:\development\php\php_5.3.9\ext\php_xdebug-2.1.2-5.3-vc9.dll
    ; Adding these lines will stop you debugging when calling Eclipse/PHP/Run as php script
    xdebug.default_enable=On
    xdebug.remote_enable=On
    xdebug.remote_host=127.0.0.1
    xdebug.remote_port=9000;
    xdebug.remote_handler="dbgp";
    xdebug.remote_autostart=off


    Now it is possible that all these parts need to be in a [xdebug] section but the jury is still out on that one.
    Please note that from this point onwards this php.ini is useless for "run as script".


    For more on these options go to http://xdebug.org/docs/remote.

    Be extra careful with xdebug.remote_host, this is the host where you develop and run your Eclipse, and PHP will try and connect to Eclipse when debugging is enabled.

    Also make sure that the zend_extension part was not added automatically by the installation, if it was don't add it again.

    If there is any mention of the Zend debugger in you php.ini file, you will have to comment that out.

    Restart Tomcat or whatever web server you're using and make sure the Xdebug installation was correct by running a simple PHP script that contains phpinfo() and searching for "xdebug".
  7. Now the tricky part, Eclipse has to be configured to accept debugging sessions from XDebug.


    Follow the steps below:

    1. Open your project in Eclipse(With PDT installed);
    2. In the main menu select Project->Properties;
    3. On the left side of the window select "PHP Debug" and then click on "Configure Workspace Settings"
    4. On the "PHP Debugger" dropdown select Xdebug and click "Apply";
    5. Click "Configure" to the right of Xdebug in the same window.
    6. Select Xdebug and click "Configure".
    7. On the "Accept remote session(JIT)" select "any" and click "OK". This is extremely important and this is where most people get stuck.

    That's it, Eclipse is now configured.

    Your PHP Preferences should look like this:

    Please note the PHP Executable  is set.
    If it isn't the debugging ISN'T going to work.
    If you choose the incorrect debugger, your project might not execute at all or could execute, but not stop at breakpoints.
    If nothing appears in your drop list it is probably because Eclipse is attempting to help you.
    Only PHP executables that are compatible with your selected PHP Debugger appear in this drop list. Select the correct one and the list populates (/facepalm).
  8. You should be able to invoke debug as... --> PHP Script on any of the scripts.
  9. Now all we need is to be able to be in control of our debugging sessions.
    To do this you have to tell the IDE that you are attempting to connect to it.
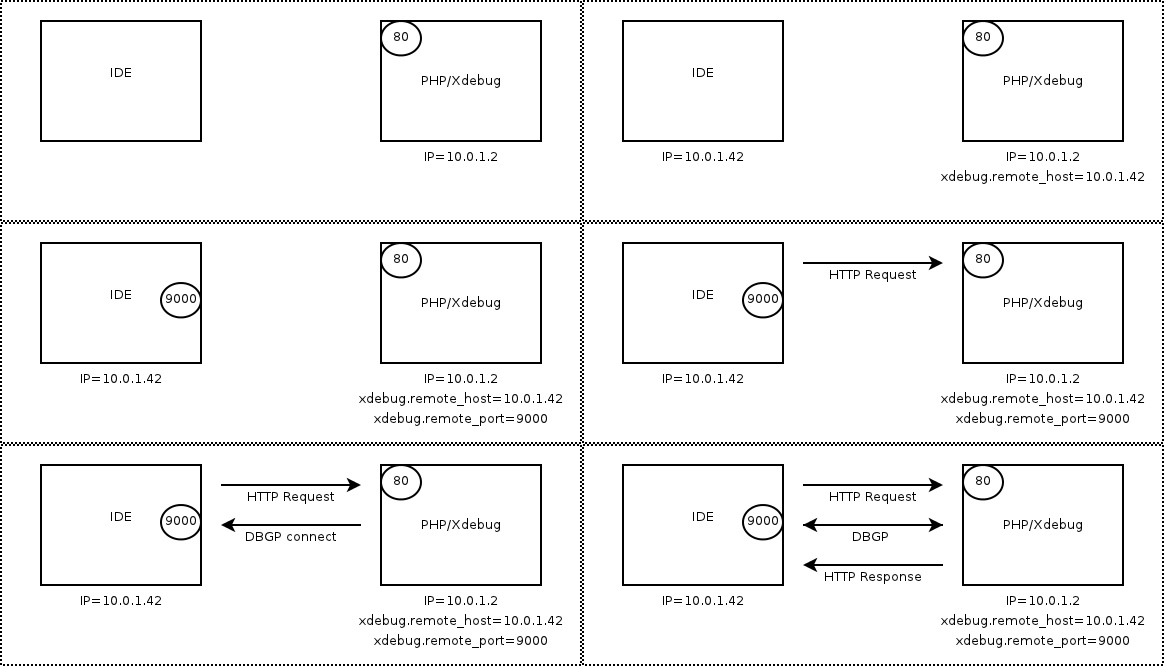
    The comms works something like this:


    To connect to the IDE/debugger is to add an option to the URL as follows: "http://localhost/jsp-php/php/index.php?XDEBUG_SESSION_STOP_NO_EXEC=ECLIPSE_DBGP&KEY=13275950773634"

    The absolutely vital part of this is the ?XDEBUG_SESSION_START=ECLIPSE_DBGP parameter.

    An easy (and reliable) way to get this to work if to invoke debug as... --> PHP Web Page. This is by far the best way to proceed as it helps eclipse know which PHP maps to which URL.

    Make sure you have [_] Open in Browser un-ticked so that it invokes your default web browser.
    When you do so it will show the following to you...

    The file I am invoking is phpinfo.php and it appears as http://localhost/jsp-php/webroot/php/phpinfo.php which is not quite right. In this case it is http://localhost/jsp-php/php/phpinfo.php clicking OK will show the script and if you have a break point set then it appears.
    I believe this gets round the problem of the path of the file not being what we need it to be.
    The URL that appears in the browser is ... http://localhost/jsp-php/php/phpinfo.php?XDEBUG_SESSION_START=ECLIPSE_DBGP&KEY=13282801757752

    It is also importat NOT to have two copies of eclipse running at once as they will both be listening on the same port! Obvious when pointed out but that doesn't stop you doing it.

    For this we will need to install a Firefox extension called "easy Xdebug"(yes Firefox, you're not developing PHP in IE are you?).
    The easiest way to set this up is using a Firefox Plugin called "Easy XDebug".
    When installed you will find a little icon on the foot of each page.

    But turning it on is not obvious. Go to Firefox;alt;View-->Toolbars-->Addons Toolbar.
  10. Now put a break point in your file.
  11. Click the little bug icon and refresh the page.
    The icon changes as follows:
  12. Step through the code with coding and variable fun and goodness;
  13. Click the icon to turn it off.
    Please not it won't work for other browsers just the one you are in.
 And that's it JSP/PHP & Tomcat in one neat package.


<<Back  | Next>>

Install and configure PHP on your machine

This might seem like an easy thing to do but you would not believe the issues I have had while setting up PHP on a 64bit W7 machine.
The intention is to run it under Tomcat as detailed elsewhere, so this is a non standard install which I also want to be able to debug through eclipse.
The steps are as follows:
  1. Down load the correct version of PHP.
    I went with the Thread safe 5.3.9 version.
    I'm not sure if that was the right choice but I followed the advice listed here. My thoughts were that I want apache/tomcat to handle multiple threads so I expected PHP to do the same.
    Note the debug pack seems to be related to creating stack traces when PHP crashes.
  2. During the install it asks where to install, I wanted to keep it out of the program files directory so I placed it in "C:\development\php\php_5.3.9\".
  3. During the install it asks for the web server set up.
    As Tomcat is not present and I have no Apache or ISS I opted for the Other CGI version.
    (I am not sure at this point if that is causing problems later with debugging).
  4. After the install you should be able to open a command prompt and check every thing is working.
    Simply type php -i  and this will dump the PHP info to screen.
    Running a PHP script is now as simple as "php myfile.php". 
  5. For the next step create a dump of this info:
    php -i > phpinfo.txt
  6. As I want to debug PHPs I need more software XDebug to be exact.
    (There is an other debugger called Zend which looks nice but it is a commercial package and I can't get it at this time.)
    So where do you go to get XDebug ... http://xdebug.org/find-binary.php.
    Take the captured output (phpinfo.txt) and post it to the form on the above page.
  7. Now follow its instructions.
    It should tells you which dll to download (plus a link) and where to put it (the /ext folder) and what to place into the php.ini file.
    Mine ended up looking like this:

    [PHP]
    ; XDEBUG
    zend_extension = C:\development\php\php_5.3.9\ext\php_xdebug-2.1.2-5.3-vc9.dll

    And you can check it is a loaded module by typing php -m which will dump the following:

    ...
    tidy

    tokenizer
    wddx
    xdebug
    xml
    xmlreader
    xmlrpc
    xmlwriter
    zip
    zlib
    [Zend Modules]
    Xdebug
  8. To confirm the set up redo steps 4 and 5 and you should get the message "You're already running the latest Xdebug version".
So far so good!

You now have PHP and its debugger installed.
Now on to gettng it to work within eclipse>>.

PHP running in Tomcat

It is fun to have PHP running in Tomcat and not too hard to achieve. Especially if you follow the instructions at PHP/Java Bridge or even here.

  1. Don't forget to Install and configure PHP on your machine or it won't work at all - duh!;
  2. From the JavaBridge Project add JavaBridge.jar, php-script.jar and php-servlet.jar to to the <tomcat home>/lib folder. (Do not be tempted to placed them in the ext folder as it will not work).
  3. Edit the <tomcat-home>/conf/web.xml file as follows:

        <filter>
            <filter-name>PhpCGIFilter</filter-name>
            <filter-class>php.java.servlet.PhpCGIFilter</filter-class>
        </filter>
        <!--
        <filter-mapping>
            <filter-name>PhpCGIFilter</filter-name>
            <url-pattern>/*</url-pattern>
        </filter-mapping>
        -->
        <!-- the following adds the JSR223 listener. Remove it if you don't want to use the JSR223 API -->
        <listener>
            <listener-class>php.java.servlet.ContextLoaderListener</listener-class>
        </listener>

        <!-- the back end for external (console, Apache/IIS-) PHP scripts; remove it if you don't need this -->
        <servlet>
            <servlet-name>PhpJavaServlet</servlet-name>
            <servlet-class>php.java.servlet.PhpJavaServlet</servlet-class>
        </servlet>

        <!-- runs PHP scripts in this web app; remove it if you don't need this -->
        <servlet>
            <servlet-name>PhpCGIServlet</servlet-name>
            <servlet-class>php.java.servlet.fastcgi.FastCGIServlet</servlet-class>
            <load-on-startup>0</load-on-startup>
        </servlet>
       
        <servlet-mapping>
            <servlet-name>PhpJavaServlet</servlet-name>
            <url-pattern>*.phpjavabridge</url-pattern>
        </servlet-mapping>

        <servlet-mapping>
            <servlet-name>PhpCGIServlet</servlet-name>
            <url-pattern>*.php</url-pattern>
        </servlet-mapping>


    And at the end of the file:
        <welcome-file-list>
            <welcome-file>index.html</welcome-file>
            <welcome-file>index.htm</welcome-file>
            <welcome-file>index.jsp</welcome-file>
            <welcome-file>index.php</welcome-file>
        </welcome-file-list>


  4. Create a new Tomcat project;
  5. Add a index.php file with this contents:

    <?php phpinfo();?>

  6. Start the server up and browse to it.
An alternate is to use Quercus which is a Java implementation of PHP which apparently supports the DBGp protocol which would be great for use with Liferay as it has the Quercus servlet as its default method of supporting PHP. The only problem is finding out how to debug the thing!!!

    Friday, 20 January 2012

    Setting up Eclipse check list (Part 3) - Plugins

    Plugins are probably very personal to what you are doing.
    My set is for:
    • Java Development;
    • JSP tomcat development;
    • PHP development;
    • Webpage development;
    • Portal development; 
    I have installed the plugins in the following order:

    JSP tomcat development
    1. Download Sysdeo Eclipse Tomcat Launcher plugin.
      Version 3.3 seems best.
      Just follow their isntructions which basicly means unzip into - Eclipse_Home/dropins;
      Add the DevloaderTomcat7.jar to the <tomcat home>/lib folder. (Do not be tempted to placed them in the ext folder as it will not work).
      On restart you should see the tomcat icons:

      Under Windows-->Preferences; Tomcat point the Tomcat Home to your desired version of tomcat.
      Under Windows-->Preferences; Tomcat set up "Contect declaration mode" to be Context files as this prevents all the messy editing of a single server.xml file;
      Under Windows-->Preferences; Tomcat-->JVM Settings point the JVM to your desired version JRE. I suggest that this is set to be the JDK you installed earlier.
      Test the whole thing with a Java project containing a dummy bean class;
      Create a web project with a JSP that targets the bean;
      Link the projects;
      Set up the devloader's paths under "Project"-->Properties ; Tomcat-->DevLoader Classpath;
      A nice article is here in case my short-hand check list is too breif.
    PHP development
    It is fun to have PHP running in Tomcat and not too hard to achieve. Especially if you follow the instructions at PHP/Java Bridge or even here.
    My notes on this are located here.
    1. Don't forget to Install and configure PHP on your machine or it won't work at all - duh!;
    2. Set up Tomcat to serve PHP by default.
    3. Create a new Tomcat project;
    4. Add a index.php file with this contents:

      <?php phpinfo();?>

    5. Start the server up and browse to it you should get the PHP info as a HTML page.
    6. Next setup debugging. This is detailed in the later post (here...)
    Setting up PHP under Tomcat can be relatively straight forwards. However at some point you are going to want to run some form of web CMS. My current suggestion is ModX. (See...)

    Portal development
    I am doing portal development with Liferay so first you need to down load the Portlet SDK from their down load site.
    A full set of install & configuration options are available on the LifeRay IDE setup pages or follow my short hand.
    1.  Down load the Liferay including tomcat and set it up as a stand-a-lone Tomcat instance (Liferay 6.1.0 contains tomcat 7.0.23).
      I don't know if it will run PHP out of the box more to add later.
      And the Sysdeo Devloader
      I installed my life ray to C:\development\java\tomcat\liferay-portal-6.1.0;
    2. Create a new eclipse workspace to preserve all the raw Tomcat setings and reconfigure with <liferay-portal-home>/tomcat-7.0.23 as your tomcat-home location;
      Don't forget to import all your Java preferences!
    3. Add under Windows-->Preferences; Tomcat-->JVM Settings

      -XX:MaxPermSize=512m
      -Xmx2048m

    4. Test your Liferay portal starts in Eclipse;
      (Start up time can be amlost 2mins 12000ms);
    5. Install the SDK
      Pick the latest comunity version of the Portlet SDK. Mine went into my java libs folder (C:\development\java\libs\liferay\6.1.0). Next add the Liferay IDE via the eclipse plugin installer which is under Help-->Install New Software ; Add. button to open Add Site dialog.Type in "Liferay IDE" for name and use the Indigo release stable URL - http://releases.liferay.com/tools/ide/eclipse/indigo/stable/.
      This comes with a large number of IDE dependencies so it is a good one to install after Sysdeo.
      If it has loaded correctly then it should add icons to your eclipse toolbar.
    6. Under Windows-->Preferences;Liferay -->Installed Plugin SDKs add the installed SDK (Mine is in :\development\java\libs\liferay\6.1.0);
    7. Under Windows-->Preferences;Liferay; Create a new Runtime environment  and choose "Liferay v6.1 CE (Tomcat 7)" ;
      Which in turn will want to know where tomcat is, (ie. C:\development\java\tomcat\liferay-portal-6.1.0\tomcat-7.0.23);
      This seems to add the correct libs when creating an addin. (???)
    8. Follow through and add a server configuration to handle this set up;
      Or it seems that the test packages will not operate correctly as there must be a target runtime to link to.


    (Prev - Java preferences)

    Monday, 16 January 2012

    LifeRay vs ModX

    Comparing two widly different products based on there Web Content Management features:


    Liferay Portal


    MODx

    Recommended Web Content Management Systems (CMS)


    Product Details

    Product NameLiferay ​PortalMODx
    Company / DevelopersLiferay,​ ​IncMODx ​team
    Latest Stable ReleaseLiferay ​Portal ​6.​0.​6MODx ​1.​0.​2
    Application Server
          
    Apache
    J2EE
    Apache
          J2EE
    Price$​0$​0
    Operating System
          Platform Independent
          Platform Independent
    License
          GPL
    LGPL
    GPL
          LGPL
    Programming Language
    Java
          PHP
          Java
    PHP
    Database
    DB2
    Microsoft SQL Server
    MySQL
    Other
    PosgreSQL
          DB2
          Microsoft SQL Server
    MySQL
          Other
          PosgreSQL
    OverviewLiferay Portal Web Content Management System by Liferay, Inc is distributed through a LGPL license. It runs on a J2EE server with support for a DB2, Microsoft SQL Server, MySQL, Other, PosgreSQL database and is in the Java programming language.MODx Web Content Management System by MODx team is distributed through a GPL license. It runs on a Apache server with support for a MySQL database and is in the PHP programming language.

    Website

    WebsiteLiferay Portal  (liferay.com)MODx  (modxcms.com)

    Features

    Root Access
    Shell Access
    Authentication Type
    Kerberos
    LDAP
    NTLM
    Pluggable
          Kerberos
    LDAP
          NTLM
    Pluggable
    Page Caching
    Database Replication
    FTP SupportLimited
    XHTML Compliant
    UTF-8 Support
    Database ReportsCosts ​Extra
    Metadata
    Friendly URLs
    Yes
    Yes
    URL Rewriting
    Yes
    Yes

    Other Features

    Content ApprovalFree ​Add ​On
    VersioningFree ​Add ​On
    Commercial Support/TrainingLimited
    Drag-N-Drop ContentLimited
    Subscriptions
    Load Balancing
    Web StatisticsLimited
    Web Services Front-end
    Yes
    Yes
    RSS

    More DetailsMore Details

    From http://web-cms.findthebest.com/compare/5-42/MODx-vs-Liferay-Portal