Showing posts with label Tomcat. Show all posts

Tuesday, 3 May 2016

Word of the Day - JBoss

JBoss is a division of Red Hat that provides support for the JBoss open source application server program and related middleware services marketed under the JBoss Enterprise Middleware brand. JBoss is an open source alternative to commercial offerings from IBM WebSphere and SAP NetWeaver.

Red Hat JBoss products are available through a subscription model that includes technical support and long-term maintenance. JBoss products include:

  • JBoss EAP - an enterprise application platform for building, deploying and hosting Java applications and services. 
  • JBoss Web Server - a Web server built on Apache and Tomcat.
  • JBoss Data Grid - an in-memory distributed database.
  • JBoss Developer Studio - an Eclipse-based integrated development environment (IDE).
  • JBoss Operations Network - a systems management suite for JBoss application environments.
  • JBoss Fuse - a modular integration platform with an enterprise service bus (ESB) to support hybrid and public cloud deployments. 
  • JBoss A-MQ - a lightweight messaging platform.
  • JBoss Data Virtualization - a data virtualization service that allows multiple data sources to be viewed and worked with as if they are a single entity.
  • JBoss BRMS - a platform for business rules management, business resource optimization and complex event processing (CEP).
  • JBoss BPM Suite - a platform for business process management (BPM).


Friday, 11 April 2014

Cool tip of the day: Heartbleed exploit

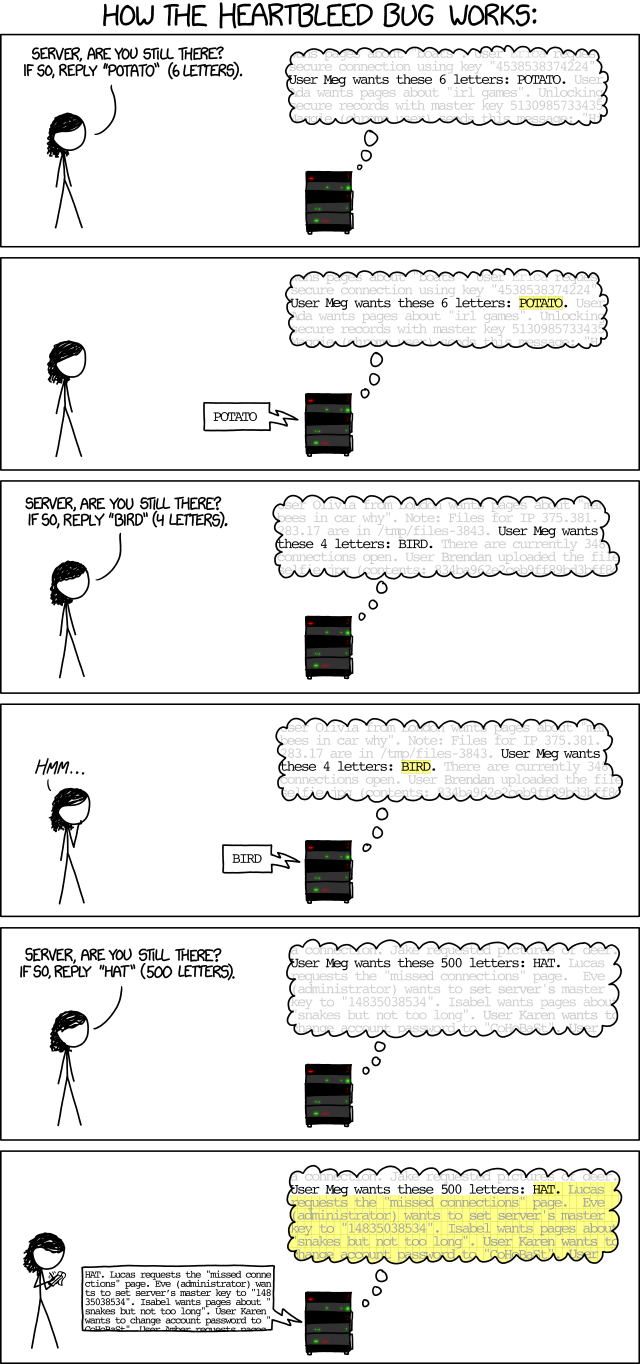
As you may have heard there is a serious problem with SSL.
But what to do about it?
The majors seem to be running around fixing things but what do us minows do?

I would suggest running this check first ... Heartbleed server test (http://filippo.io/Heartbleed/).

If you are not sure what this all means I found this link helpful

And in closing:

Wednesday, 9 April 2014

Cool tip of the Day Granule

The load time of your web page is often down to the number JS and CSS files that your page includes.
There is a tension between developers and sysadmins, developers want to keep everything simple and in separate editable files while the sysadmins want a nice simple & fast load time.
If you see some of the suggestions on optimising your site (see: http://developer.yahoo.com/performance/rules.html) the suggestion is to keep things together.

80% of the end-user response time is spent on the front-end. Most of this time is tied up in downloading all the components in the page: images, stylesheets, scripts, Flash, etc. Reducing the number of components in turn reduces the number of HTTP requests required to render the page. This is the key to faster pages.
One way to reduce the number of components in the page is to simplify the page's design. But is there a way to build pages with richer content while also achieving fast response times? Here are some techniques for reducing the number of HTTP requests, while still supporting rich page designs.
Combined files are a way to reduce the number of HTTP requests by combining all scripts into a single script, and similarly combining all CSS into a single stylesheet. Combining files is more challenging when the scripts and stylesheets vary from page to page, but making this part of your release process improves response times.
SO how to solve this ... for JSP/JAVA devs use Granule (https://code.google.com/p/granule/).
To quote there site...
Granule is an optimization solution for Java-based web applications (JSP, JSF, Grails). It combines and compresses JavaScript and CSS files into less granulated packages, increasing speed and saving bandwidth.
The granule solution includes:
  • JSP Tag library. You just need put the tag around your StyleSheets and JavaScripts to compress and combine them.
  • Ant task, to include pre-compressing in your build scripts.
HAY-PRESTO! Every one is happy.


Friday, 1 November 2013

Cool tool of the day: Sitemesh

Why Use SiteMesh?

SiteMesh is a lightweight and flexible Java web application framework that applies the Gang of Four decorator pattern to allow a clean separation of content from presentation.

I am posting it here as I have used this tool before and really like it but I just spent 10 minutes attempting to recall what it was called.

The jars for site mesh can be found on the Maven repository or but pasting this into your POM.xml:


<dependency>
    <groupId>opensymphony</groupId>
    <artifactId>sitemesh</artifactId>
    <version>2.4.2</version>
</dependency>
            

Setting up Eclipse (again)

I have documented the setting up of eclipse before but in the almost two years since that post I have learned a few new tricks. SO I'm documenting them here in case they are useful to someone else.

Java JDK

You will probably have Java installed, but it will only be the JRE, which will hot have all the environment variables established. The JDK can be found by searching on Google and it will probably be the top link.
I have this time around down loaded the version 7 JDK from here (http://www.oracle.com/technetwork/java/javase/downloads/jdk7-downloads-1880260.html). (Don't forget to pick the right version and accept the licensing  terms).

On a windows PC the easiest location to install all of these files is under a single directory structure ... with NO spaces in the name.
I will use "c:\development" throughout this post (cos it's what I use).

So:
  1. Download the JDK installer;
  2. Place it in a new folder  "c:\development\java";
  3. Run the installer (as administrator);
  4. Wait for it to start & press the next buttons;
  5. At the Optional Features deselect the "Public JRE" as you already have one;
  6. Change the installed directory to  "c:\development\java\jdk1.7.0_45\" (where 1.7.0_45 is the JDK version);
  7. Now install by pressing next;
  8. Set an environment variable JAVA_HOME = C:\development\java\jdk1.7.0_45;
  9. Add to the PATH environment variable %JAVA_HOME%\bin;
  10. Open a command prompt and check that the maven command "java-version" runs and gives the correct version.

Maven

Since my last version of this install guide I have been working with Maven, which is a build tool. I had produced a nice set of ANT scripts to do what MAVEN does but I have decided that this is just too much like reinventing the wheel.

So:
  1. Download the zip;
  2. Place into a new folder "c:\development\maven";
  3. Extract the files to  "C:\development\maven\apache-maven-3.1.1";
  4. Create an environment variable M2 = C:\development\maven\apache-maven-3.1.1;
  5. Add to the PATH environment variable %M2%\bin;
  6. Open a command prompt and check that the maven command "mvn -version" runs and gives the correct version.

Eclipse 

With the JDK set up now install the version of Eclipse you prefer.
My current favorite is the Spring Tool Suite (STS) since it comes with may of the tools and plugins pre-installed.

So:
  1. Download the latest STS; from http://spring.io/tools/sts/all ensuring you get the right version for your OS
  2. Place it in a new folder called "c:\development\eclipse";
  3. Run the installer (as administrator);
  4. Accept the licensing agreement;
  5. Accept the default installation location which should be C:\development\eclipse\springsource;
  6. Install all the toys;
  7. Set up the JDK path to be C:\development\java\jdk1.7.0_45;
  8. It may complain that a 32-bit or 64-bit version is needed which means you made a mistake at step #1;
  9. When prompted for a short cut group call it "Java Development";
  10. Launch the tool set to ensure it works;
  11. When prompted for a workspace create one with out spaces ie. "C:\development\projects\default-eclipse";
  12. You may be prompted to install any updates if they exist;
  13. Create a "Hello World" project and check whether you have Java set up correctly;

Eclipse plugins (optional)

Having installed Eclipse it is now a mater of installing a set of plugins. These vary accourding to taste and your development purpose; mine is Java web development.
I've written about the set of plugins I use before (here, & here and here). 
I'm not going to detail which ones I'm just going to list those that I use and include a 'bookmark.xml' import to list them.
The Plugins I use are:
  1. Sysdeo JSP/Tomcat Manager -  This plugin allows you to start or stop the tomcat environment and perform remote debuging;
  2. Log4e - Log4E is an Eclipse Plugin which helps you to use your logger easily in Java Projects; 
  3. StartExplorer- This plug-in gives you a convenient way to examine a file or a folder outside the Eclipse workspace with your file manager or open a shell/cmd.exe  and do all this by adding a few entries to Eclipse's context menus.
  4. SubEclipse - Links to your subversion source control.
  5. Aptana Studio -  HTML, CSS etc editing
 
 Interesting ones:
  1. C# development

XAMPP

This has to be the sweetest install of the set. It is an entire Apache LAMP stack installer with Tomcat included.
The best version if you are installing to windows is the full instalation tool sooner than the zip version.

So:
  1. Download the latest XAMPP;
  2. Place it in a new folder called "c:\development\xampp";
  3. Run the installer (as administrator);
  4. Follow the next buttons and select all the toys;
  5. Select the installation to c:\development\xampp\1.8.3 (where 1.8.3) is the current version;
  6. Wait a long time for the installation top complete;
  7. Start the control panel and start up HTTPD;
  8. Open a browser and check http://localhost, if you don't get a page titled XXXX then you may have something else running on port 80.
    The usual culprits are IIS or Skype these systems need to be configured to use any thing other than 80,443, 8080, 8443 (which are all ports used by Httpd & Tomcat);
    Shut those services down or change their ports (see articles on IIS or Skype respectivly) and retry (PS. don't forget to force your browser to refresh the page or you could be thinking it is still there).
  9. Tomcat should have its admin user set up.
    You can check this by browsing to http://127.0.0.1:8080/manager/status.
    If it fails shut down tomcat & edit the web-users.xml file (in the above config this is C:\development\xampp\1.8.3\tomcat\conf\web-users.xml);
    Add a set of nodes as follows:
    <role rolename="manager-gui"/>
    <user username="tomcat" password="s3cret" roles="manager-gui"/>
    Then restart.
<< Previously in this series
 

Saturday, 31 August 2013

Transitioning from ANT to MAVEN

Well I have been putting together ANT scripts for some time now and I have created some funky scripts.
My main issue with ANT was that I had to do all the hard work over and over again. I did work to include IVY into my projects but it was just hard work and the scripts grew in complexity.
I had heard good things about MAVEN so I thought I might as well get stuck into it.

After some successes I smacked straight into an issue regarding the precompilation of JSPs which seems to be a dead topic as the plugins do not seem to work correctly or only work if you are building a WAR.
I want to precompile some JSPs and put them into a JAR ... but no joy.
So right now I am looking back at the ANT scripts and looking how best to include them in to MAVEN.

The first clue was a post on Slashdot titled "Multiple antrun tasks in maven".

The key is to have a series of ANTRuns stuck into your MAVEN script as follows:
<plugin>

    <artifactId>maven-antrun-plugin</artifactId>
    <executions>

        <execution>
            <id>clean</id>
            <phase>clean</phase>
            <configuration>
                <tasks>
                    <echo message = ">>>>>>>>>>>>>>>>>>>>>>>>>>clean"/>
                </tasks>
            </configuration>
            <goals>
                <goal>run</goal>
            </goals>
        </execution>

        <execution>
            <id>compile</id>
            <phase>compile</phase>
            <configuration>
                <tasks>
                    <echo message = ">>>>>>>>>>>>>>>>>>>>>>>>>>>>compile"/>
                </tasks>
            </configuration>
            <goals>
                <goal>run</goal>
            </goals>
        </execution>

        <execution>
            <id>package</id>
            <phase>package</phase>
            <configuration>
                <tasks>
                    <echo message = ">>>>>>>>>>>>>>>>>>>>>>>>>>>>package"/>
                </tasks>
            </configuration>
            <goals>
                <goal>run</goal>
            </goals>
        </execution>

    </executions>

</plugin>
asas

Friday, 15 March 2013

Cool tip of the day - Bitnami Stacks

When you need a LAMP stack or a Tomcat Stack for development ... what do you do?

Yes you go trawling around the net looking for all the bits and how to glue them together.
Well don't just go to http://bitnami.org/stacks and download their all in one stack.

My favorite is the tomcat stack!

Tuesday, 12 March 2013

Quick Guide to setting up Tomcat on Linux

Tomcat's default website

Before starting

Check for the process:


# ps ax | grep tomcat

If it is installed it will show up in the response (don't be fooled by just grep tomcat).

And check the OS (see):
$ cat /etc/*-release
$ uname -m

This will tell you the release and whether it is 64 or 32 bit.

Install the Java JDK

Versions of Java can be installed using the “yum” tool (this will require super user rights). 
See: http://wiki.centos.org/HowTos/JavaOnCentOS


When installed I find that a convenience symbolic link "/java" is helpful.
Often the Yum tool places the files here /usr/lib/jvm/java-6-oracle
NB.
ln -s [TARGET DIRECTORY OR FILE] ./[SHORTCUT]

You can download the latest JDK here: http://www.oracle.com/technetwork/java/javase/downloads/index.html
The problem with this site is that it asks for you to accept the license conditions before you can down load the file.
This can be done by checking the url you get after browsing the appropriate links (see but best done using firefox not IE).

We'll install the latest JDK, which is JDK 7, Update 17. The JDK is specific to 32 and 64 bit versions.

My CentOS box is 64 bit, so I'll need: jdk-7u17-linux-x64.tar.gz.

If you are on 32 bit, you'll need: jdk-7u17-linux-i586.tar.gz
ie.

wget http://download.oracle.com/otn-pub/java/jdk/7u17-b02/jdk-7u17-linux-i586.tar.gz

NB. I'm not sure this works at all so I used WinSCP and transferred the file.

Start by creating a new directory /usr/java: (# mkdir /usr/java).
Download the appropriate JDK and save it to /usr/java directory we created above.

Unpack jdk-7u17-linux-x64.tar.gz in the /usr/java directory using tar -xzf:
tar -xzf jdk-7u17-linux-x64.tar.gz  

DON'T FORGET!!! 
... Set JAVA_HOME and put Java into the path of our user!

JAVA_HOME=/usr/java/jdk1.7.0_17
export JAVA_HOME 
PATH=$JAVA_HOME/bin:$PATH 
export PATH 
   
NB. The export command will marks each VAR for automatic export to the environment of subsequently executed commands i.e. make the local shell variable VAR global. (see)

Check you did it correctly:

#echo $JAVA_HOME 
#java -version

One GOTCHA at this point can be the error "-bash: /usr/java/jdk1.7.0_17/bin/java: /lib/ld-linux.so.2: bad ELF interpreter: No such file or directory"

This is easy to fix (see here) by issuing this command:
yum -y install glibc.i686
 

Download & Install Tomcat

If necessary versions of Tomcat can be installed by hand or using “yum”.

Details on Tomcat can be found here: http://tomcat.apache.org/ or more specifically: http://tomcat.apache.org/tomcat-7.0-doc/index.html.

We can manually do this as follows (installing Tomcat 7 under /usr/share.).
Download and unzip.

# wget http://mirror.ox.ac.uk/sites/rsync.apache.org/tomcat/tomcat-7/v7.0.37/bin/apache-tomcat-7.0.37.tar.gz
# tar -xzf apache-tomcat-7.0.29.tar.gz

 From this point you should be able to start the process by jumping to /user/share/apache-tomcat-7.0.37/bin and running the start.sh

For more information on starting as a service : see http://www.davidghedini.com/pg/entry/install_tomcat_7_on_centos

NB. I haven't gone into the details of tidying up the service with symbolic links (an exercise for the reader and me to tidy up in future.) 

To check the process is working then the following operation will work:

#curl -I http://localhost:8080


Tuesday, 4 December 2012

Pre-configured stacks ... nice!


http://bitnami.org/stack/tomcatstack
I haven't tried these yet but they look worth a go ...
There are a number of different pre configured stacks for your downloading and installing pleasure.

Including installers for vm-ware ... nice!

Friday, 12 October 2012

Web projects have a "No org.apache.tomcat.InstanceManager set in ServletContext"

When creating a web project in eclipse I keep geting an error "No org.apache.tomcat.InstanceManager set in ServletContext" within the JSP files created and placed into the work folder. While it does not stop the project running it is very anoying.
It can be easily fixed by adding the tomcat-api.jar to your list or libraries.
I recommend you add it as follows:
  1. Start to edit your project class path;
  2. Click add variable;
  3. Click the TOMCAT_HOME variable followed by the Extend... button; This will allow you to browse for the libs/tomcat-api.jar file;
  4. Click OK and you should get the following in your list of directories:
And you are done ... In this way it will be portable to someone elses PC.

An interesting article on stackoverflow can be found here : http://stackoverflow.com/questions/8064039/why-shouldnt-we-place-tomcat-library-in-our-appln-libraries

Monday, 8 October 2012

Spring Security 3.0.x J2EE Pre-Authentication Example


A developer called "Steve Krall" wrote this:
"The pre-authentication sample application provided by spring-security is confusing. It seems to use an outdated XML configuration. I wanted to find a simple example, but I was only able to piece together the various configuration options from forum posts and the spring-security documentation. This sample is more of what I was looking for. Hopefully it's useful to others."

https://github.com/skrall/spring-security-j2ee-preauth-example

Thanks Steve!

Tuesday, 18 September 2012

Download Java JRE/JDK 7 from shell

File under the heading of Arrgh @#@?#&!

While setting up Tomcat7 from a console window on CENTOS I thought I would download the JDK but you can't because the fhe first step to do so, is to wget (download) the rpm / bin install file?

But as a fellar called Shmuel points out "Well it seems like since Java7, you must accept license agreement on the download page, before you can download java, which make sense. The problem with that is that you cannot accept this license agreement if you are on shell, doing wget."

In summary:
  1. Use Firefox & enable Fiddler to spy on your browser history;
  2. Go and find the down load you need from here;
  3. Accept the licence conditions and start the down;
  4. Then copy from fiddler the URL and most importantly the authorisation parameter which you can just add to your wget url.

Saturday, 8 September 2012

Set up Remote Debugging in Tomcat

Debugging tomcat can be a little but of a pain especially when it is a remote server.
So a quick solution is to use a remote debug option.
A good article on this can be found here (http://en.newinstance.it/2005/10/04/remote-debugging-tomcat-with-eclipse/).
But to add to this information I created a batch file called "runDebug.bat" in the tomcat/bin folder.

The file is:

set JPDA_TRANSPORT=dt_socket
set JPDA_ADDRESS=5050
catalina jpda start

Adding process monitoring

Having set that up you may want to use JConsole to monitor the process.
JConsole comes with the JDK and can be found lurking in the bin folder of your Java installation. 

To enable it with Tomcat you need to mmend your batch file as follows:

set JPDA_TRANSPORT=dt_socket
set JPDA_ADDRESS=5050
set JXM_PORT=5636
set CATALINA_OPTS=-Dcom.sun.management.jmxremote -Dcom.sun.management.jmxremote.port=%JXM_PORT% -Dcom.sun.management.jmxremote.authenticate=false -Dcom.sun.management.jmxremote.ssl=false -Dcom.sun.management.jmxremote.hostname=%COMPUTERNAME%/%JXM_PORT%

(NB. Make sure the CATALINA_OPTS is on one line).

A usefull reference on JConsole can be found here (http://java.sun.com/developer/technicalArticles/J2SE/jconsole.html)
 
The next thing you will want to do is add some MBeans to your project. Which can be handled via Annotations.


Thursday, 31 May 2012

Data Replication for Stores

(Extract from an article on Oracle's Blog)

A tough problem for store systems is reliably moving data between the home office and stores in both directions. There are many solutions to this problem, each with its own positives and negatives. One solution is using the open-source software SymmetricDS, which was created for this very problem during the Oracle Retail POS implementation at BigLots. The original developers formed JumpMind, a company specializing in helping retailers use open-source to solve difficult problems.

SymmetricDS is an open-source, web-enabled, database independent, data synchronization software application. It uses web and database technologies to replicate tables between relational databases in near real time. SymmetricDS is database agnostic and can even synchronize data between different types of databases.
The idea of  SymmetricDS came from the need to synchronize many small, inexpensive databases at stores to a single, large, more expensive one at a corporate location. We needed something that would trickle sales data over a slow network and survive outages

It is possible to host SymmetricDS under Tomcat but it runs very nicely under Jetty as a single command line task.

(More..) (And on facebook...)

Tuesday, 7 February 2012

Running LifeRay as a windows service.

This is an ongoing investigation.
SO far the best steps seem to be:
  1. Copy from a tomcat 7 set up the Tomcat7w.exe and all the associated <tomcat>\bin\*.bat files into your Liferay distribution, as they don't seem to come as standard.
  2. Edit the service.bat so that it contains the following lines:
    rem Set default Service name
    set SERVICE_NAME=LiferayTomcat7
    set PR_DISPLAYNAME=Liferay 6.1


    (lines 77-79).
  3. Install the service as normal (here...).
  4. Add the setting in the registry...
    In HKEY_CURRENT_USER\Software\Microsoft\Windows\CurrentVersion\Run
    Add a setting called "LifeRayMonitoring" like this:
    "C:\development\Java\tomcat\liferay-portal-6.1.0\tomcat-7.0.23\bin\Tomcat7w.exe" //MS//LiferayTomcat7
    This will start the monitoring service for you.
  5. Now the part I am less sure about. The memory settings.
    This is done by editing the Java Options on the Java Tab.
    It should read:
    -Djava.io.tmpdir=C:\development\Java\tomcat\liferay-portal-6.1.0\tomcat-7.0.23\temp
    -Djava.util.logging.manager=org.apache.juli.ClassLoaderLogManager
    -Djava.util.logging.config.file=C:\development\Java\tomcat\liferay-portal-6.1.0\tomcat-7.0.23\conf\logging.properties
    -Xms512M
    -Xmx1024M
    -XX:MaxPermSize=256m
    -Dfile.encoding=UTF8
    -Duser.timezone=GMT

    -agentlib:jdwp=transport=dt_socket,server=y,suspend=n,address=8000

    The first part is created when you set up the service when startup.bat was run.
    the memory settings are those recommended in the admin manual.
    The three starting with -agentlib are to allow remote debugging against port 8000.
  6. No start remote debugging your portlets (See...)
This is a work in progress but I think it is accurate.

Wednesday, 1 February 2012

Using Tomcat Native DLL

Most of the time this error message goes unnoticed:

INFO: The Apache Tomcat Native library which allows optimal performance in
production environments was not found on the java.library.path: C:\...


Time to deal with it!

Downloaded tcnative-1.dll from http://www.apache.org/dist/tomcat/tomcat-connectors/native/1.1.22/binaries/win64/

Here you'll find the binaries for Windows 64-bit platform.

  • x64 is for AMD64/EMT64 architecture (Most current 64 bits architectures).
  • ia64 is for Intel IA64 architecture (Itanium only). 
If you pick the wrong one you will recieve a warning mesage saying you have the wrong architecture.
Go get the other and restart.

I placed mine in the JDK folder as follows "C:\development\java\jdk1.6.0_25\bin" so that it will be reused for all Tomcat instances.

I have notices about a 10% speed up but that is only on the process start. Begining Liferay with the dll gave "INFO: Server startup in 95164 ms", while with out gave "INFO: Server startup in 101845 ms".
Which is 6.7 seconds faster!
I'll have that thanks!

Thursday, 26 January 2012

Setting up Eclipse check list (Part 6) - PHP Web development with Tomcat

If you like Xdebug, please consider a donation.
At this point we have to ensure that we have PHP running fine in Tomcat.
  1. Create a new JSP Project called jsp-php.
    Give it a site folder called /webroot.
  2. Give it an index.html file and run the site up to see if it works. (which it should).
  3. Now create it a file (& folder) called /jsp/default.jsp which should have some thing like:

    <%@ page language="java" contentType="text/html; charset=ISO-8859-1"
        pageEncoding="ISO-8859-1"
        import="java.util.Date"
        %>
    <!DOCTYPE html PUBLIC "-//W3C//DTD HTML 4.01 Transitional//EN" "http://www.w3.org/TR/html4/loose.dtd">
    <html>
        <head>
            <meta http-equiv="Content-Type" content="text/html; charset=ISO-8859-1">
            <link href='http://fonts.googleapis.com/css?family=Cuprum' rel='stylesheet' type='text/css'>
            <link href="../basic.css"  rel="stylesheet" type="text/css" media="screen" />
            <title>Insert title here</title>
        </head>
        <body>
            <h1>New JSP Page</h1>
            <%
            Date now = new Date();
            %>
            Now = <%=now.toString() %>
        </body>
    </html>


    in it.

    Test it to make sure you haven't f****d up Tomcat.
  4. Now create a file (&folder called) /php/index.php which should have something like this:
    <!DOCTYPE html PUBLIC "-//W3C//DTD HTML 4.01 Transitional//EN" "http://www.w3.org/TR/html4/loose.dtd">
    <html>
        <head>
            <meta http-equiv="Content-Type" content="text/html; charset=ISO-8859-1">
            <link href='http://fonts.googleapis.com/css?family=Cuprum' rel='stylesheet' type='text/css'>
            <link href="../basic.css"  rel="stylesheet" type="text/css" media="screen" />
            <title>Insert title here</title>
        </head>
        <body>
            <h1>New PHP Page</h1>
    <p><a href="phpinfo.php">PHP Info</a></p>
    <?php        
            $brush_price = 5;
           
            echo "<table border=\"1\" align=\"center\">";
            echo "<tr><th>Quantity</th>";
            echo "<th>Price</th></tr>";
            for ( $counter = 10; $counter <= 100; $counter += 10) {
                echo "<tr><td>";
                echo $counter;
                echo "</td><td>";
                echo $brush_price * $counter;
                echo "</td></tr>";
            }
            echo "</table>";
    ?>
        </body>
    </html>


    Give it a run and check it works.
  5. Now create a phpinfo.php page.
    Browse to it and ensure you have the correct PHP server and ini file in use.
    Look out for the Zend logo at the bottom.
  6. Assuming this is fine and JSP & PHP both run now we need to set up debugging.
    This is done initially by adding the following options to the top of your php.ini file:

    [PHP]

    ; XDEBUG
    zend_extension = C:\development\php\php_5.3.9\ext\php_xdebug-2.1.2-5.3-vc9.dll
    ; Adding these lines will stop you debugging when calling Eclipse/PHP/Run as php script
    xdebug.default_enable=On
    xdebug.remote_enable=On
    xdebug.remote_host=127.0.0.1
    xdebug.remote_port=9000;
    xdebug.remote_handler="dbgp";
    xdebug.remote_autostart=off


    Now it is possible that all these parts need to be in a [xdebug] section but the jury is still out on that one.
    Please note that from this point onwards this php.ini is useless for "run as script".


    For more on these options go to http://xdebug.org/docs/remote.

    Be extra careful with xdebug.remote_host, this is the host where you develop and run your Eclipse, and PHP will try and connect to Eclipse when debugging is enabled.

    Also make sure that the zend_extension part was not added automatically by the installation, if it was don't add it again.

    If there is any mention of the Zend debugger in you php.ini file, you will have to comment that out.

    Restart Tomcat or whatever web server you're using and make sure the Xdebug installation was correct by running a simple PHP script that contains phpinfo() and searching for "xdebug".
  7. Now the tricky part, Eclipse has to be configured to accept debugging sessions from XDebug.


    Follow the steps below:

    1. Open your project in Eclipse(With PDT installed);
    2. In the main menu select Project->Properties;
    3. On the left side of the window select "PHP Debug" and then click on "Configure Workspace Settings"
    4. On the "PHP Debugger" dropdown select Xdebug and click "Apply";
    5. Click "Configure" to the right of Xdebug in the same window.
    6. Select Xdebug and click "Configure".
    7. On the "Accept remote session(JIT)" select "any" and click "OK". This is extremely important and this is where most people get stuck.

    That's it, Eclipse is now configured.

    Your PHP Preferences should look like this:

    Please note the PHP Executable  is set.
    If it isn't the debugging ISN'T going to work.
    If you choose the incorrect debugger, your project might not execute at all or could execute, but not stop at breakpoints.
    If nothing appears in your drop list it is probably because Eclipse is attempting to help you.
    Only PHP executables that are compatible with your selected PHP Debugger appear in this drop list. Select the correct one and the list populates (/facepalm).
  8. You should be able to invoke debug as... --> PHP Script on any of the scripts.
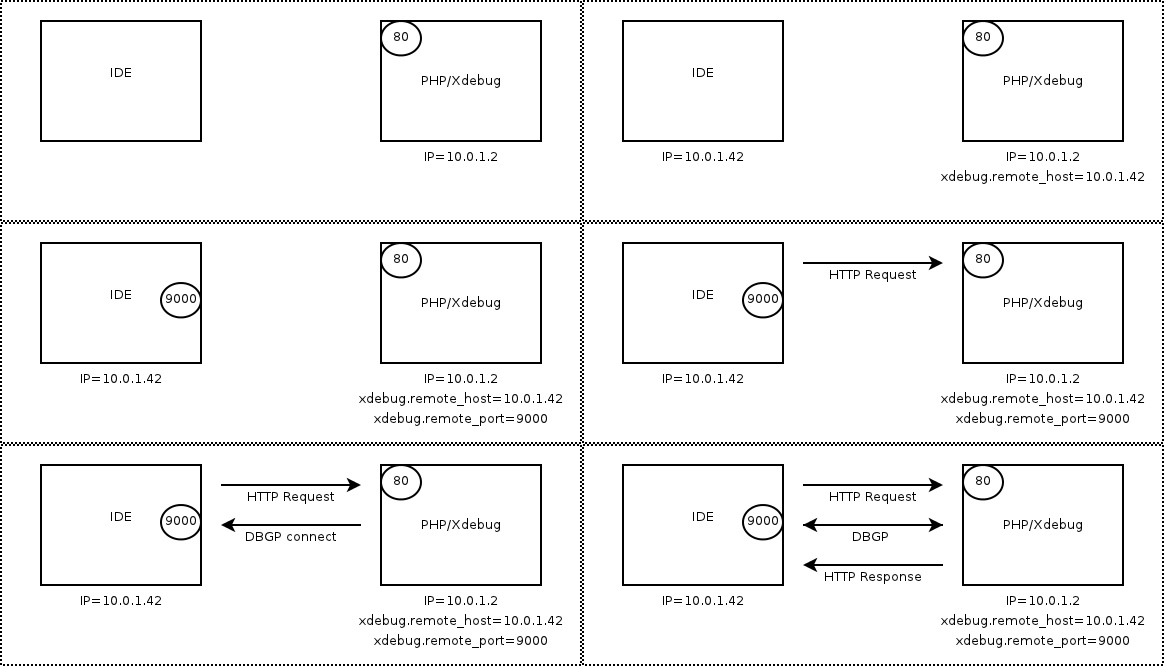
  9. Now all we need is to be able to be in control of our debugging sessions.
    To do this you have to tell the IDE that you are attempting to connect to it.
    The comms works something like this:


    To connect to the IDE/debugger is to add an option to the URL as follows: "http://localhost/jsp-php/php/index.php?XDEBUG_SESSION_STOP_NO_EXEC=ECLIPSE_DBGP&KEY=13275950773634"

    The absolutely vital part of this is the ?XDEBUG_SESSION_START=ECLIPSE_DBGP parameter.

    An easy (and reliable) way to get this to work if to invoke debug as... --> PHP Web Page. This is by far the best way to proceed as it helps eclipse know which PHP maps to which URL.

    Make sure you have [_] Open in Browser un-ticked so that it invokes your default web browser.
    When you do so it will show the following to you...

    The file I am invoking is phpinfo.php and it appears as http://localhost/jsp-php/webroot/php/phpinfo.php which is not quite right. In this case it is http://localhost/jsp-php/php/phpinfo.php clicking OK will show the script and if you have a break point set then it appears.
    I believe this gets round the problem of the path of the file not being what we need it to be.
    The URL that appears in the browser is ... http://localhost/jsp-php/php/phpinfo.php?XDEBUG_SESSION_START=ECLIPSE_DBGP&KEY=13282801757752

    It is also importat NOT to have two copies of eclipse running at once as they will both be listening on the same port! Obvious when pointed out but that doesn't stop you doing it.

    For this we will need to install a Firefox extension called "easy Xdebug"(yes Firefox, you're not developing PHP in IE are you?).
    The easiest way to set this up is using a Firefox Plugin called "Easy XDebug".
    When installed you will find a little icon on the foot of each page.

    But turning it on is not obvious. Go to Firefox;alt;View-->Toolbars-->Addons Toolbar.
  10. Now put a break point in your file.
  11. Click the little bug icon and refresh the page.
    The icon changes as follows:
  12. Step through the code with coding and variable fun and goodness;
  13. Click the icon to turn it off.
    Please not it won't work for other browsers just the one you are in.
 And that's it JSP/PHP & Tomcat in one neat package.


<<Back  | Next>>

PHP running in Tomcat

It is fun to have PHP running in Tomcat and not too hard to achieve. Especially if you follow the instructions at PHP/Java Bridge or even here.

  1. Don't forget to Install and configure PHP on your machine or it won't work at all - duh!;
  2. From the JavaBridge Project add JavaBridge.jar, php-script.jar and php-servlet.jar to to the <tomcat home>/lib folder. (Do not be tempted to placed them in the ext folder as it will not work).
  3. Edit the <tomcat-home>/conf/web.xml file as follows:

        <filter>
            <filter-name>PhpCGIFilter</filter-name>
            <filter-class>php.java.servlet.PhpCGIFilter</filter-class>
        </filter>
        <!--
        <filter-mapping>
            <filter-name>PhpCGIFilter</filter-name>
            <url-pattern>/*</url-pattern>
        </filter-mapping>
        -->
        <!-- the following adds the JSR223 listener. Remove it if you don't want to use the JSR223 API -->
        <listener>
            <listener-class>php.java.servlet.ContextLoaderListener</listener-class>
        </listener>

        <!-- the back end for external (console, Apache/IIS-) PHP scripts; remove it if you don't need this -->
        <servlet>
            <servlet-name>PhpJavaServlet</servlet-name>
            <servlet-class>php.java.servlet.PhpJavaServlet</servlet-class>
        </servlet>

        <!-- runs PHP scripts in this web app; remove it if you don't need this -->
        <servlet>
            <servlet-name>PhpCGIServlet</servlet-name>
            <servlet-class>php.java.servlet.fastcgi.FastCGIServlet</servlet-class>
            <load-on-startup>0</load-on-startup>
        </servlet>
       
        <servlet-mapping>
            <servlet-name>PhpJavaServlet</servlet-name>
            <url-pattern>*.phpjavabridge</url-pattern>
        </servlet-mapping>

        <servlet-mapping>
            <servlet-name>PhpCGIServlet</servlet-name>
            <url-pattern>*.php</url-pattern>
        </servlet-mapping>


    And at the end of the file:
        <welcome-file-list>
            <welcome-file>index.html</welcome-file>
            <welcome-file>index.htm</welcome-file>
            <welcome-file>index.jsp</welcome-file>
            <welcome-file>index.php</welcome-file>
        </welcome-file-list>


  4. Create a new Tomcat project;
  5. Add a index.php file with this contents:

    <?php phpinfo();?>

  6. Start the server up and browse to it.
An alternate is to use Quercus which is a Java implementation of PHP which apparently supports the DBGp protocol which would be great for use with Liferay as it has the Quercus servlet as its default method of supporting PHP. The only problem is finding out how to debug the thing!!!

    Monday, 23 January 2012

    LIferay - new liferay project "Failed while installing Liferay Portlet 6.0"

    While attempting to create my first Liferay project I found my self facing an error.
    "Failed while installing Liferay Portlet 6.0. Most of the project seemed to be present but there were missing xml files and a missing icon. Being dumb and keen I perservered. The portlet would deploy but nothing worker right.
    So having deleted everything I came in on the monday morning to start again.
    A quick bit of research shows the following:
    • Installing Eclipe for Java developers does not include the web development tools;
      So a dynamic web site will not work;
    • Installing the Liferay IDE plugin fetches you the latest version of the tools which allows a dynamic web site 2.x to 3.0;

    When a dynamic web project  is created, various information is assembled to specify the type of project, add standard libraries, set compiler options, control publishing tasks, set the build path and/or add an annotation processor. This information is specified by choosing facets during project creation. Facets can also be added and deleted from a project after its initial creation. To edit a project's facets, select Project > Properties > Project Facets.
    Facets have version numbers. Not all facet version numbers can be changed (e.g., a facet available in only one version of software can not have other version numbers). Some facet version numbers are inter-dependent (e.g., if you choose the facet Java Annotation Processing, you must also have Java version 5.0 selected since Java versions 1.3 and 1.4 did not support annotation processing).
    Doing some more research I discovered that the version number was related to the Servlet API version. A snippet from Wikipedia: http://en.wikipedia.org/wiki/Java_Servlet


    Servlet 3.0December 2009JavaEE 6, JavaSE 6Pluggability, Ease of development, Async Servlet, Security, File Uploading
    Servlet 2.5September 2005JavaEE 5, JavaSE 5Requires JavaSE 5, supports annotations
    Servlet 2.4November 2003J2EE 1.4, J2SE 1.3web.xml

    Tomcat 7 will support 2.2 and 3.0 (See ...) and if you attempt to create a standard dynamic web project everything goes fine.
    So what to do .....

    While creating your project click the Advance project configuration... button link.


    After selecting this option select a lower version of the servlet protocol. Postings on the Liferay forum seem to indicate that 2.5 and 3.0 do not work.So choose 2.4 ...

    This seems to work a treat!

    Friday, 20 January 2012

    Installing and setting up Liferay on Tomcat 7

    Liferay is distriuted under a LGPL licence.

    Author used Tomcat 7.0.23  & Liferay 6.1.0
    This is an abreviated version of a very usefull article on installing LifeRay into an existing Tomcat container. (See...)
    • Ensure Tomcat already runs and has no other webapps;
    • Install the Liferay Dependencies bundle in your Tomcat installation (See...);
      There are three JARs and they go in tomcat-x.x.x/lib/ext.If you do not have the ext directory, create one. This folder is for JARs that are loaded by the Bootstrap class loader.
    • Add " Java transaction manager " jta.jar (Available here; download class files and rename the ZIP file jta.jar.) (Software License Agreement);
    • Add mail.jar (Available here; located in root of the downloaded ZIP file.) (JavaMail License Agreement);
    • Delete all the contents in /ROOT;
    • Move the files from the .war to the now empty ROOT folder. The simplest way to do this is to open it with an archiver program such as 7zip or WinRAR, then copy/extract all of the files into ROOT. 
    • Add a file version.txt to the folder as a reminder of the version of LifeRay in use.
      ie. "liferay-portal-6.1.0-ce-ga1-20120106155615760"
    • Edit the file and add the line
      set "JAVA_OPTS=%JAVA_OPTS% -Xmx1024m -XX:MaxPermSize=256m"
      
      Somewhere near the top.;
    • Inside eclipse change the VM tomcat settings for the Sysdeo plugin.
      This is under Window-->Tomcat-->JVM Settings [Append to JVM Parameters][Add]...
      -Xmx1024m 
      -XX:MaxPermSize=256m
    Which may not work at this time as there do not seem to be enough JARs in the ext folder.

    OR
    • This version comes with data and a set of plugins which appear as webapps;
    • Start up Tomcat and the start up triggers a browser window titled "Basic Configuration";
    • Set the portal name;
    • Set the default language to English (UK);
    • Don't forget to set up the admin user;
    • Finish the configuration;
    • The configuration will be stored in a file called portal-setup-wizard.properties located at the same level as the tomcat server folder;
    • Click Goto my Portal and see the portal;
    • Shut down tomcat and edit the tomcat server.xml  file change "<Connector port="8080"" to "<Connector port="80"";
    • Re-start tomcat to check the new port;
    • Next we need to set up the email client.Liferay's default configuration looks for a mail server on the same machine on which Liferay's running, and it tries to send mail via SMTP to this server. If this is not your configuration, you'll need to modify Liferay's defaults. To do this, you'll use a portal-ext.properties file.
      The file that is used to override the configuration is portal-ext.properties. This file should be created in your Liferay Home folder.